 |
| 2014 Hoffman Challenge Fabric-Indigo |
Yes, my blog posts have been rather sparse this past month...but that is not due to a lack of quilting. Quite the opposite: I've been very busy working on a new quilt to enter in the
2014 Hoffman Challenge.
I came across the 2014 Hoffman Challenge earlier this year and loved the challenge fabric, but had absolutely zero ideas as to what kind of original quilt design I could ever make. Every few days I would visit the website to look at the fabric and even after seeing it on the bolt at one of my favorite quilt shops--I still drew a total blank on ideas. And just as I was about to forget this challenge entirely, inspiration struck! While surfing some of my favorite blogs and Pinterest, I kept seeing images of owls which are all the rage this year. Seeing those big ole owl eyes suddenly reminded me of the mandalas floating around on the challenge fabric and I rushed out to the quilt shop the very next day to pick up 2 or 3 yards of the challenge fabric. Ever since starting this quilt, more and more owls are being spotted everywhere: online, shopping trips, fashion, etc! So at least I know they are still popular: let's hope that wins some judges favor!
 |
| The start of my lil owls |
Since the owl eyes triggered the memory of the fabric, it seemed fitting to kickstart this by selecting which mandalas to use for the eyes. I chose two each of my two favorite mandalas to fuse and then carefully cut out. Next, two of the mandalas had similar petals, one set being slightly larger than the other. Fusible was ironed onto the fabric and then I carefully trimmed out the individual petal shapes, keeping the two sizes separate. Once I had a nice pile o' petals, they were laid out in interlocking rows to create two owl chests. And there these two quilts remained for well over a month as I continued to research owl anatomy via Pinterest, hoping for Pinspiration as to how to complete my lil owls with the challenge fabric.
 |
| Full Moon Phase |
Once I finally sat down with the fabric and took a closer look, I started to see lots of possibilities for various owl body parts: flower petals in pink and light blue could make for some lovely wing feathers, yellow feathers that looked a lot like claws or talons...etc. And gradually, bit by bit, my two feathery friends came together.
 |
| Tree for Two Tails |
Now that the owls were mostly assembled, it was time to set the romantic stage for my owls by framing them with a full moon against a starry sky backdrop. The freezer paper appliqued moon was made with a wonderful cream and grey marbled fabric and Sulky invisible thread.
Marbled brown batik fabric was used to freezer paper applique some tree branches for my lil' lovers to perch upon. Before appliqueing the tree down, care was taken to tucked the tail feathers behind the branch first.
 |
| Look whooooo has arrived?!? |
Now that my little scene was set, it was time to add some texture with free motion quilting using a colorful selection of
Sulky threads, to be eligible for The Best Use of Sulky Awards. I started by outline stitching the moon and tree to baste everything in place before filling in each of these spaces with different free motion fillers:
- pebbling for the moon with some hidden floating quilted hearts (Sulky Rayon #1236)
- spirals for the sky (Sulky Rayon #2106)
- bark for the tree (Sulky Rayon #2133)
 |
| Tower of Threads |
In total, I used 11 different Sulky threads (rayon, polyester, cotton, invisible and metallic) to embellish my quilt with lots of thread painting, especially on each of the owls. With great relief, my Bernina played nicely with all but the metallic thread which did break a few times. But otherwise, the threads just glided through my machine producing beautiful stitches along the surface of my quilt. I'd start with one color of thread and doodle away on the owls, adding texture throughout. I'd start with a spool of thread and microdoodle away in similar colored areas. After burying each of my thread tails after each round, I would quickly flip over the quilt to see all the stitches truly pop on the solid black backing, creating a whole cloth quilt effect on the back. Then I'd move onto the next spool of thread, anticipating the next sneak peak of the quilt back!
 |
| 11 different Sulky threads creating texture on the front and a colorful surprise on the back |
My poor tree looked so barren and the background seemed so very dark and dreary. So a pop of color and depth were added with some pieced 3-D leaves. The leaves were made from an assortment of pink, orange, yellow and teal fabrics, including stripes and fabrics that read as a solid. Lime green piping was added to the center during the piecing, creating a channel to conceal floral tape that could then be twisted and manipulated to add another layer of texture and dimension. Lime green sulky thread was used to stitch in some veins and satin stitch the leaves to a felt backing. Once all my leaves were assembled, zig zag stitching was used to conceal the floral tape steps and attach the leaves to the quilted top.
 |
| Owl You Need Is Love Finished Front |
When it came time to bind my quilt, care was taken not to draw attention away from the owls. While I considered finished by facing, but went with double fold binding, as I could do it well and it would minimize the amount of handwork needed to attach the 4" quilt sleeve. However, when it came time to cut the 2.5" strips, I realized I did not have enough yardage remaining. Rushing to the store's website, I was despondent when the fabric came up but was out of stock! I called anway, hoping there might be some small chance that the website was wrong and the shop staff sure made my day when they let me know there was still some yardage remaining on the bolt. This brief hiccup led to yet another happy discovery: the starry fabric glows in the dark!! Upon learning this little detail, I grabbed the quilt and ran to the bedroom closet, shut the door and confirmed that it does in fact glow. How awesome is that?!?
 |
| Owl You Need Is Love Backing |
And while the challenge required us to use a recognizable amount of the challenge fabric on the quilt front, I decided to use some of my fused scraps along the quilt sleeve and label on the reverse side of the quilt. It was an easy detail to include. since I truly hope people will have the opportunity to see the back of my quilt.
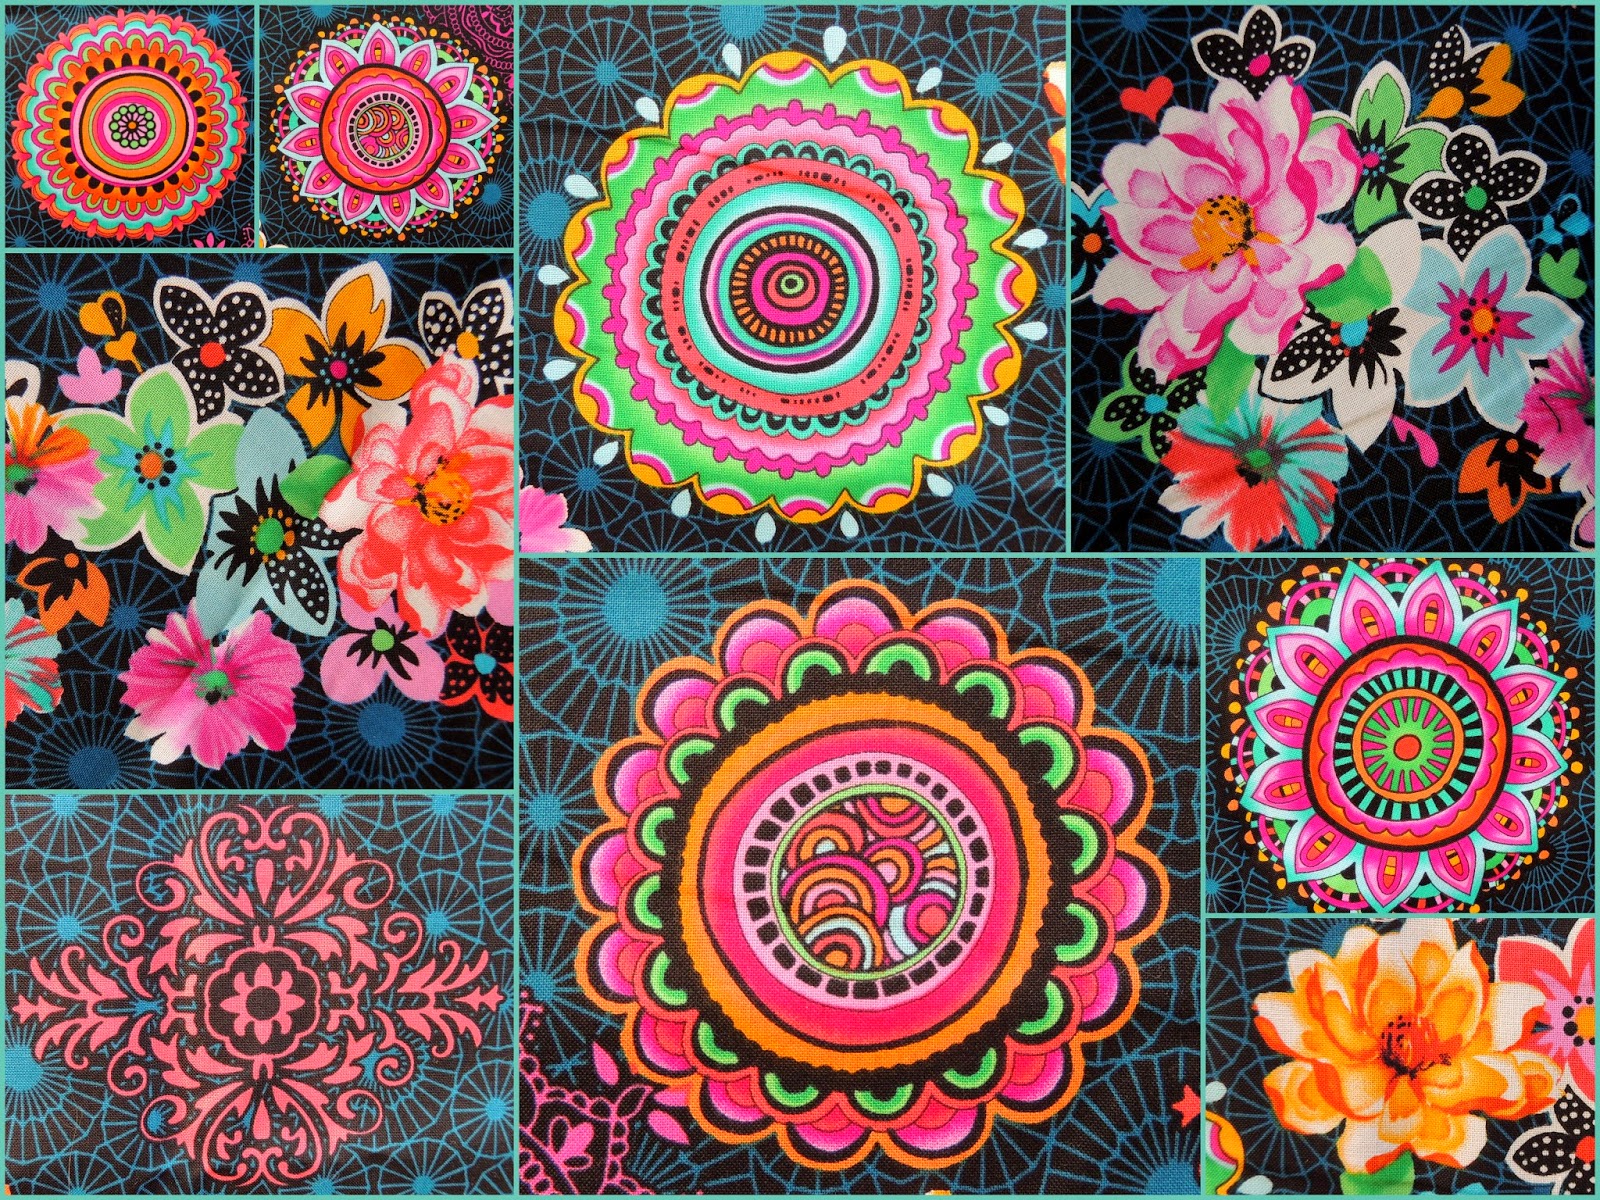 |
| Fabric details used in Owl You Need Is Love--See if you can locate them all in use within my owls or quilt back |
 |
| That's Owl Folks--be sure to visit again soon to see all the "Wicked" fun I am having now in the studio! |
Comments
Post a Comment
I am delighted you took the time and thought to leave me a comment. It may take a day or two for your comment to appear as I moderate them prior to posting to filter out spam and inappropriate content. Cheers!