My guild posts various quilt challenges for its membership via Facebook, including
The Wicked Cherrywood Challenge. I've visited the Cherrywood booth at PIQF and loved the suede-like texture of these 100% cotton fabrics. Heck, I've even purchased one of their
Tropicana fat quarter bundles that was simply too gorgeous to cut up! While talking to my mom about the various challenges out there, I mentioned the Wicked challenge and admitted that I had no visions or ideas. She is super creative, so our brainstorming sessions are always productive. Even though she hadn't seen the musical, she was familiar with the Wizard of Oz and threw out a few ideas and when she mentioned tornado--I was instantly inspired and motivated. Immediately after our phone conversation, I submitted my registration to gain access to the Wicked Fat Quarter Bundle including Black Onyx and 3 shades of Wicked Green, as well as purchased a fat quarter bundle of their
Onyx to Light gradation to create a stormy look.
 |
| Cherrywood bundle up top and their Kona counterparts |
As I was contemplating the actual tornado design and construction, I purchased a stack of Kona solids in green and gray gradations to use for quilt mock ups--saving my precious Cherrywoods for the final piece. I am so glad I did as my earlier experiments were quickly scrapped. I am relatively new to solids, so I thought I would cut up some strips to create my own patterns of stripes and checkerboards, which not only took up a lot of time and effort but I just didn't love. So back to the drawing board.
After much research and brainstorming, I decided to create ticker tape pieces that could be fused into a tornado-like design.
 |
| Ticker Tape Tornado |
I started with an 18" square background of the Onyx black, fused onto Pellon Decor Bond stabilizer. The ticker tape bits were created out of 2.25" strips that were fused with Pellon Wonder Under and then cut down into 1/2" by 2" pieces. And I fearlessly busted out the Tropicana bundle, selecting the yellow and aqua fat quarters to add a pop of color to my whirlwind. As I was cutting up the yellow strips, I saw flashes of yellow bricks and immediately went to work constructing a yellow brick road for my center. From there, I gradated into various greens strips, aquas and light to dark grays to create a concentric design from light to dark. I loved the look and immediately fused it down by iron.
Since I was working with fat quarters, I didn't have a piece large enough to meet the 20" square finished quilt requirement. So borders were needed to meet the size requirement, but how to complement my tornado center and not detract. I decided to keep it simple with 2" spinning borders of green Cherrywood--which nicely framed my tornado and ensured that I met the 60% of the quilt top featuring the Wicked bundle of fabrics.
 |
| Paper Mock Up Of Logarithmic Spirals |
While I loved the center design, I was really hoping to create a tornado spiraling out from the center. Since everything was fused down, I achieved my spiral during the quilting phase. Yet, I was not entirely sure how to go about creating a uniform spiral that would radiate out from the center and required minimal marking. Even my attempts to sketch out spirals on paper came out super awkward and ugly. So I turned to Doug for some mathematical insights.
We researched various spirals and first started with
Fibonacci or Golden Spirals--but they always seemed off-center. We kept looking at various spiral designs, and finally saw a spiral that exactly matched the visions in my head:
Logarithmic Spirals!
 |
| Logarithmic Spiral Freezer Paper Template |
These logarithmic spirals could be created with a formula which was totally foreign to me, but Doug took one quick look and he immediately put his engineering and math training to work translating my vision into degrees and distance from the origin points that could be plotted along a Polar graph. So while I was making a paper mock up and marking 30-degree lines, he used several computer applications and websites to calculate all the various points that I then plotted at 30 degree intervals using an Engineer's ruler. A french curve was used to connect the first set of dots, creating a beautiful spiral radiating out front the center. Then the points were plotted starting at the 180-degrees vector, creating a set of spirals swirling around each other. These were traced onto freezer paper, cut out and ironed onto the quilt top achieving a totally mark-free quilting template!
 |
| 1st Spiral Quilted and then the Second Spiral Filled In |
 |
| Wiggly Tentacles (aka Mini Twisters) and Label |
Once the spiral shape was determined, the actual basting and quilting was completed in less than a day. The first spiral was quilted with dense pebbling in Aurifil grey to simulate Galinda's bubbly personality and her ability to travel by bubble. The line dividing the two spirals was echoed in a matching lime green Aurifil thread and the remaining spiral was filled in with green triangles filled in with cross hatching, creating Elphaba's witch hat and broom. Then mini twisters (aka Leah Day's Wiggly Tentacles) lined the border.
And here are some detail shots of the front of the quilt...
 |
| Close Up Shots of the Quilt Front |
 |
| Wicked Windy & Winding Ways Front |
 |
| Wicked Awesome Quilt Back |
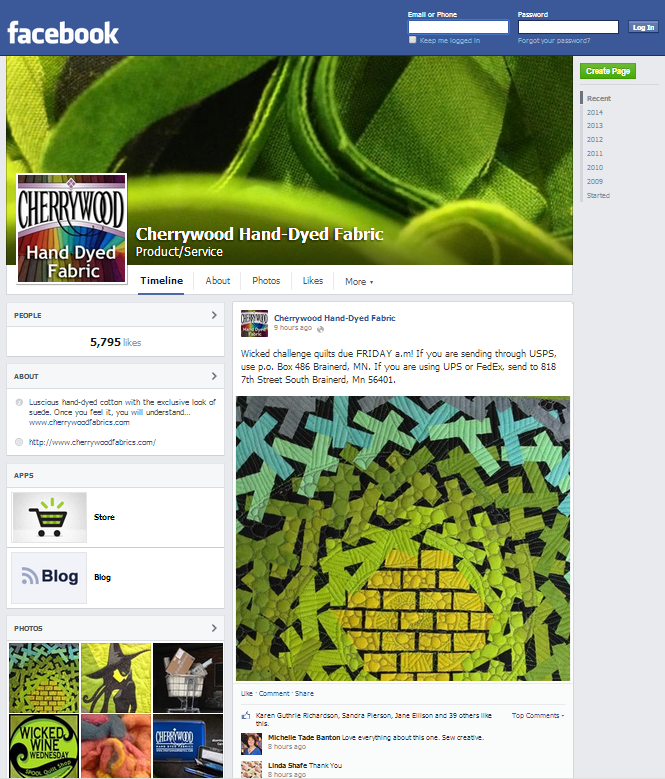
I received an email yesterday confirming the receipt of my quilt. And today, I got a visual confirmation that my quilt arrived safe and sound, as they posted a photograph of it on their
Facebook page!! How wicked awesome is that?!? Out of 70+ quilts they've received thus far, mine was among 5 or 6 total that have been posted over the past 5+ weeks. Let's hope that is a good sign that they liked my design and it has a chance of being accepted in the travelling show and a possible contender for a prize?!?
"Witch" me luck! :-)
 I received an email yesterday confirming the receipt of my quilt. And today, I got a visual confirmation that my quilt arrived safe and sound, as they posted a photograph of it on their Facebook page!! How wicked awesome is that?!? Out of 70+ quilts they've received thus far, mine was among 5 or 6 total that have been posted over the past 5+ weeks. Let's hope that is a good sign that they liked my design and it has a chance of being accepted in the travelling show and a possible contender for a prize?!?
Love the design, the colors, and the quilting.
ReplyDelete