 |
| Fabrics featured in this post were provided by Michael Miller Fabrics as part of being a Michael Miller Brand Ambassador |
I love the winter holidays and was excited about the Michael Miller Brand Ambassador Holiday Cheer theme for our July Projects. I reflected over some of our favorite Christmas traditions: Setting up a Christmas Tree filled with lots of handmade ornaments, hanging up our stockings Christmas Eve, and making homemade Irish Cream, and setting up our Lego Advent Calendars (one for me and one for my partner Doug).
 |
| Holiday Cheer |
Remembering this daily dose of Holiday Cheer, I set out to create a quilted Advent Calendar. One of the new Michael Miller Holiday fabric collections coming out is Home for the Holidays, featuring homes decked out for the holidays, stacks of wrapped packages, cars loaded with trees and gifts, bundled up snow people, and accompanying Sugar Stripes. I added some Cotton Couture solids and Garden Pindots to create my Advent Calendar. You can watch my video teaser showcasing this fun fabric collection here.
Read on as I share my process for creating a Christmas Countdown Calendar along with some gift-giving suggestions, so you'll be ready to create your own daily Holiday Cheer this December!
 |
| Home for the Holidays Prints and Accompanying Basics |
Fabrics Requirements (as shown top left to bottom right):
- Home for the Holidays (CX8381-WINT-D) - 3/4 Yard for the Outer Border
- That's a Wrap (CX8383-CHEE-D) - 1.25 Yard for Pocket Backing
- Garden Pindots - Ink (CX1065-INKX-D) - 2 yards for Pockets
- Evergreen Sugar Stripe (CX8386-EVER-D) - 2/3 Yard for Flanges and Binding
- Watermelon Cotton Couture Solid (SC5333-WATE-D) - 1/4 Yard for Odd Numbers
- Frosty Friends with Winter Navy Background (CX8384-WINT-D) - 2 yards for Quilt Back
- Holiday Shopping with Sky Blue Background (CX8382-SKYX-D) - 1/4 Yard for Embellishing Pockets
- Spearmint Cotton Couture Solid (SC5333-SPEA-D) 1/4 Yard for Even Numbers
- Peppermint Sugar Stripe (CX8386-PEPP-D) - 1/2 Yard for Binding Pockets
Other Materials/Supplies Used in the Construction:
- Pellon Fusible Fleece - 1 Yard to Add Body/Stability for Pockets
- Pellon Wonder Under (805) - 1/3 yard for Raw Edge Appliqued Numbers and Embellishments
- Pellon Decor Bond - 4 feet for Support in Quilt Sandwich
- Low Loft Batting - 50" x 50"
- Elmer's White School Glue for Construction
- 3-M Blue Painter's Tape for Quilting Guide
- White (#2024) Aurifil Thread in 40wt and 50wt for Piecing and Quilting
Step 1: Pocket Panel Preparations
To create the pocket numbers using raw edge fusible applique, numbers 0 through 9 were enlarged to approximately 2" tall and printed out onto paper to use as templates. Each number had to be reversed prior to fusing onto fabric, so I turned the paper templates upside down onto a lightbox and placed the Wonder Under on top, paper side up, to trace using a fine tip Sharpie marker. Once all the numbers were traced, the numbers were fused onto the corresponding Cotton Couture solid:
- Watermelon Cotton Couture was used for all the odd numbered pockets
- Spearmint Cotton Couture used for the even numbers pockets
 |
| Pocket Embellishment Preparations |
To help save you time, here is how many of each number you will need to trace, fuse and cut:
# - # of red, # of green (total # that need to be traced onto fusible)
# - # of red, # of green (total # that need to be traced onto fusible)
0 - 2 green (2 total)
1 - 8 red, 5 green (13 total)
2 - 3 red, 6 green (9 total)
3 - 3 red (3 total)
4 - 3 green (3 total)
5 - 3 red (3 total)
6 - 2 green (2 total)
7 - 2 red (2 total)
8 - 2 green (2 total)
9 - 2 red (2 total)
- Pocket #1 - A reindeer driving a red car loaded with a Christmas Tree
- Pocket #24 - Santa Claus delivering gifts via a green car
- Pocket #25 - Presents
I encourage you to have fun with the embellishment process using 2" or smaller motifs from any of the Home for the Holidays collection featuring snow people, trees, wreaths, and stacks of wrapped gifts.
 |
| Embellished Pockets |
Instead of making 25 individual pockets (each approximately 7" square), I prepared 5 large rectangular pocket panels, each measuring 36" wide by 6" tall. Each of these pocket panels includes a little extra allowance for quilting and seams, and will be trimmed down at a later stage and formed into 25 pockets through straight line quilting.
Each pocket panel is assembled using 36" x 6" piece of fusible fleece sandwiched with two same sized rectangles of Ink Garden Pindots. Only one side of the fusible fleece has fusible, so a hot dry iron was used to fuse the fabric panel into place, following Pellon's instruction. The other fabric panel was spray basted into place. Once each pocket panel was layered and basted, it was time to space out the pocket numbers and motifs:
- Small sections of Blue Painter's Tape were used to mark my large cutting mat with the following increments: 0.5" (trim/seam allowance), 7", 7", 7", 7", 7", 0.5" (trim/seam allowance) The numbers were centered horizontally into each of the 7" spaces.
- A ruler to place numbers/motifs 1.75" from the bottom of each pocket panel.
 |
| Placement of Pocket Embellishments |
Each pocket panel was quilted separately using Aurifil 40wt. By laying a square of acrylic plastic placed on top of a panel, I used dry erase markers to doodle out a few different designs and pathways.
 |
| Design Doodles |
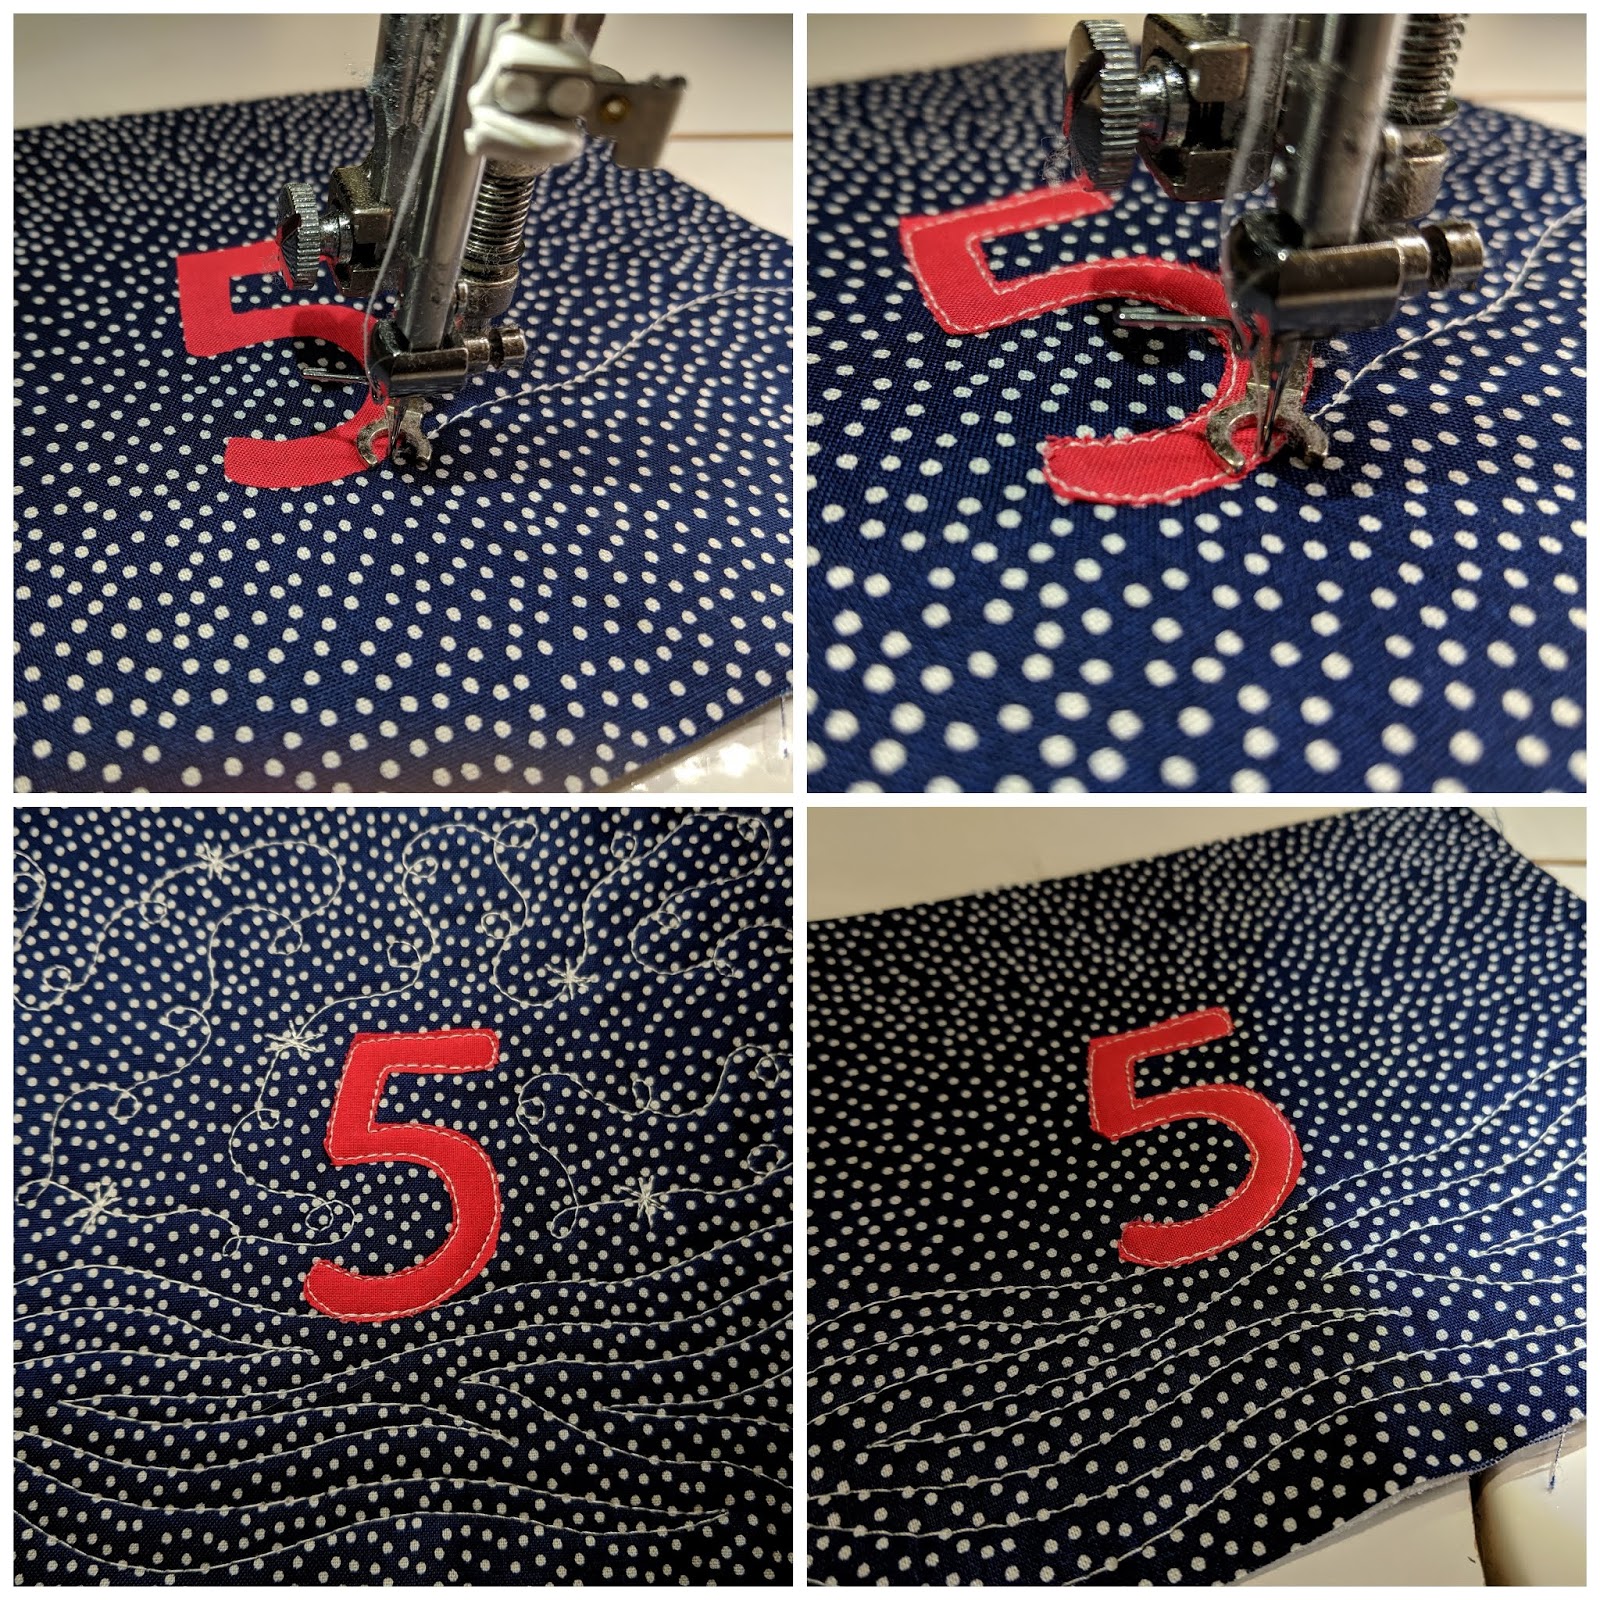
Here are the quilting motifs and pathway I used for all five panels (top left, clockwise), which allows me to quilt each panel in one pass without breaking thread:
1. A wavy line was stitched across the panel, taking care to connect to the bottom of each number/motif (top left)
2. Once contact is made with each number/motif, complete all outline stitching prior to continuing via the wavy line across the entire panel (top right)
3. Once I made it to the left side of the pocket panel, I travelled back across the bottom with some flame quilting to create my snowy drifts (bottom right)
4. The top half was then filled in with a snowflake and loop de loop meander (bottom left)
 |
| Pocket Panel Pathway for Quilting |
Once all five pocket panels were quilted, I carefully trimmed them down to 35.5" x 5.5" prior to binding the top edge using 5 strips of 2.25" Peppermint Candy Stripe. Starting on the plain backside of each panel, a thin bead of Elmer's School Glue was used along the top edge to glue baste the binding strips into place prior to stitching. The glue is heat set with a hot dry iron. Using a small bead of glue will not damage your needle or machine and if needed, the strip can be peeled back and repositioned with more glue. Moreover, Elmer's School Glue is a starch-based product, so it will help stabilize your edges and is machine washable. And I couldn't resist sharing a photo of me winning a game of bobbin chicken where I managed to stitch all the binding strips into place with just 1/4" of bobbin thread remaining (bottom left photo)!
 |
| Binding Prep-Round 1 |
Once I stitched the raw edge of binding along the top edge, backside of each panel, I pressed the binding strip away with some Mary Ellen's Best Press and then turned over to the good side for another good press using a hot dry iron.
 |
| Pressing Strip Open |
The folded edge of binding is then pressed into place along the front of the pocket panel. Another small bead of glue just above the stitched line is used to glue baste the binding into place prior to top stitching with White Aurifil 50wt thread.
 |
| Basting Strip for Top Stitching |
Step 2: Pocket Construction
Once all 5 pocket panels are prepped and bound, it is time to start constructing the center of the advent calendar. Using the That's a Wrap print, cut out 5 pocket back panels, each measuring 7.5" x 35.5". As these pockets involve multiple panels and layers, I opted to glue baste the background onto each pocket panel. Place a thin bead of Elmer's School Glue along the three unbound edges on the backside of each quilted pocket panel. Place a background panel, right side down onto the glue basted pocket panel, taking care to align all three glue basted edges and heat set with a hot dry iron.
 |
| Glue Basting Background Panel onto Each Prepped Pocket Panel |
Taking this extra step will greatly help manage all the layers as we start to assemble the rows of pockets. Starting with the top row (#1-5), right side facing up, place a thin bead of glue along the bottom edge only. Take the next row (#6-10) and flip up, right sides together, carefully aligning the top edge of the background panel with the bottom of the glue basted pocket panel. Heat set and stitch using a 1/4" seam allowance. Press the bottom panel down (much easier as it is only one layer of fabric). Continue adding one row at time until all 5 rows are stitched into one large center panel.
 |
| Piecing Together Pocket Rows |
Step 3: Adding Borders
To frame my pockets, I added spinning borders that include a striped flange. Each border strip is 6" wide by WOF cut from the Home for the Holidays print. Four flange strips were cut out of the Evergreen Candy Stripe, each measuring 1.25" wide x WOF. Each flange strip was pressed in half and the raw edges were glue basted onto the bottom of each border strip.
 |
| Preparing Border Strips with Flanges |
Spinning borders involve partial seams, which are easy to piece. I lay out all my border/flange strips into place around my center panel of pockets. Flip Border Strip #1 over right sides together,, with your center panel and stitch with a 1/4" seam allowance, taking care to stop at least 6" from the other edge (red dashed line). Do not trim this end yet. Press the border strip up away from the center, allowing the flange to overlap the center panel. Once pressed, trim left most edge even with the center panel, giving you a clean edge to attach Border Strip #2. Border Strip #2 is stitched from the bottom along the center panel, and across the newly added Border Strip #1, off the edge (purple dashed line). Press open and trim both ends square. Add Strip #3 (blue dashed line) and repeat steps again with Strip #4 (green dashed line). Once you have attached Border Strip #4, you can go back to Border Strip #1 and stitch the loose end closed along the edge of Border Strip #4 (yellow dashed line), press open and trim square.
 |
| Using Partial Seams to Add Spinning Borders |
Step 4: Layering and Quilting
Once your quilt top is complete, assemble your quilt sandwich:
1. Center and Fuse Decor Bond onto the wrong side of your Quilt Back using steam as directed by Pellon's instructions. Note: the Decor bond will be a few inches shorter in width, but is only needed to provide support for the central pocket panel.
2. Place quilt back (now fused with Decor Bond) right side down onto your table/surface
3. Layer batting
4. Layer quilt top right side up
5. Pin baste
Given all the extra bulk and layers, I kept the quilting fairly simple using Aurifil 40wt. Horizontal stitching in the ditch was done between each row of pockets (between the pocket back and above quilted pocket panel), as well as more stitching in the ditch in between each of the spinning borders and striped flange. Four vertical lines were measured and stitched at 7" increments, yielding a total of 25 pockets. After I stitched over each pocket's binding, I backtracked for 3/4" and stitched forward again to help reinforce each pocket against potential wear and tear or stress from loading/unloading the pockets. A simple medium-scale stipple meander was used to quilt the 4 spinning borders. Take care not to stitch too close to the striped flanges, where there is considerable bulk especially along the intersections with the pocket bindings. You'll benefit from my multiple thread breaks before realizing the culprit!
 |
| Simple Quilting |
Here is a peak at the quilt backing, featuring the Frosty & Friends print. Note that I had originally ordered 1.5 yards of the backing print, which was just a few inches short. I pieced togther a few remaining scraps of the That's a Wrap and the Peppermint Candy Stripe, but have added extra yardage into the fabric requirements above (although some simple piecing will still be involved).
 |
| Quilt Backing |
Step 5: Binding
Binding was completed by machine using 5 strips 2.25" wide by WOF from the Evergreen Candy Stripe to complete this Christmas Countdown Calendar. There is enough yardage listed if you prefer binding with 2.5" wide strips.
 |
| Christmas Countdown Calendar, Finishes 46" x 45" |
Gift Ideas:
I absolutely love the finished project, and can't wait to hang it up December 1st to start the gift-giving fun!! Our plan is for me to stock small gifts for Doug in the even numbered pockets, and he will place my gifts in the odd numbered pockets. Then we'll both leave each other a gift for December 25th.
Each pocket is approximately 7" wide and 5" deep, making for lots of space to hide a fun variety of holiday goodies for your loved ones. Here are a few gift ideas, each of which is small enough to fit into a pocket!
 |
| Holiday Gift Ideas For All Your Loved Ones |
- Top Row: handwritten card/note & holiday ornament, socks, tie, winter gloves/scarf/hat, and handkerchief/bandana
- 2nd Row: Small toys such as Lego polybag or a fidget spinner, crayons, stickers, small games, and playing cards
- 3rd Row: Pens/pencils/erasers, small notebooks/journals, chapstick/nail polish, bath pouf, small bottles of hand lotion
- 4th Row: pet toys/leash/collars, gardening seeds, reusable shopping bag, cd or small book, and emergency preparedness supplies such as first aid kit or small flash light.
- Bottom Row: Sunglasses, pocketknife/Multi-tools, cocktail mixes/recipes, candy/treats, and gift cards/certificates.
 |
| Gifts Stowed Away |
And I couldn't resist including a line up of gift-giving ideas for my fellow quilters, featuring some of my favorite Quilting supplies and notions!
 |
| Holiday Cheer for Quilters |
Here are some of my top quilting picks to include on your list for Santa (top left to bottom right):
- Top Row: Michael Miller fabric (precuts including fat quarters, a few 2.5" strips from a jelly roll or 5" charm packs), small notebook, small or large spools of Aurifil thread, Machingers Gloves, and 3-M Blue Painter's tape
- 2nd Row: Sench brand self-threading needles, marking pens, Havel Snip-EZE thread snips, sewing machine feet/accessories, and top-stitch sewing machine needles.
- 3rd Row: Bobbin Ring/Saver to store bobbins, package(s) of spare bobbins, 6" Karen Kay Buckley serated scissors, Fiskars easy action scissors, Olfa rotary cutter, and spare blades.
- 4th Row: small rotary rulers, magnetic pin cushion, pins, Elmer's School Glue, and a small Color Wheel
- Bottom Row: Numbered pins, seam ripper, measuring tape, Start Your Art cards/Creative Strength Training Prompt Cards, and more Michael Miller fabric!!
- Other ideas include: gift certificates to a local quilt shop, registration for a quilting workshop, guild membership, and/or tickets to an upcoming quilt show! In lieu of wrapping paper, wrap each small gift in a fat quarter or 10" layer cake square!!
 |
| Gift Giving Ideas for Quilters |
December 1st is 4 months away: Plenty of time to whip up your own Christmas Countdown Calendar! I'd love to see what you create, and what fun gift-giving ideas you have for filling all 25 pockets with Holiday Cheer. And I am already thinking about adapting this project to include 8 pockets for all my jewish friends celebrating Hanukkah! Wishing you and your loved ones a Happy Holiday season ahead!

Comments
Post a Comment
I am delighted you took the time and thought to leave me a comment. It may take a day or two for your comment to appear as I moderate them prior to posting to filter out spam and inappropriate content. Cheers!