 |
| Dinos on Parade, Finishes 51" x 51" Fabrics featured in this post were provided by Michael Miller Fabrics as part of my being a Michael Miller Brand Ambassador |
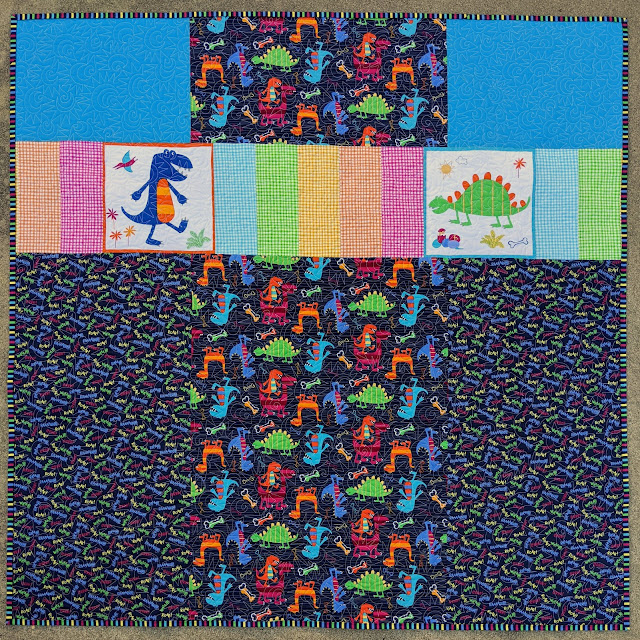
This month's Michael Miller Brand Ambassador project is a baby quilt made using improvisational piecing with the Dino World collection of delightful dinosaurs:
- Dino World 24" Panel (top): 1.5 panels
- Roarsome print with text on a navy background (right): 1.4 yard
- Dinosaur Stripe with navy background (bottom): 1/2 yard
- Dino Dudes print in midnight (left): 1.5 yard

Coordinating Gingham Play prints were selected in Magenta, Pumpkin, Marigold, Fern, and Luna (1/4 yard each) in addition to Midnight Cotton Couture solid (1/3 yard).

I'll share my process for construction, which began with using improvisational piecing for the sashing strips.
Cutting Prepwork:
- Midnight Cotton Couture Solid: Cut a total of ten 1" x WOF strips.
- Gingham Play: Cut two 4" x WOF strips from each of the 5 colors and subcut into eight 10.5" x 4" rectangles (we'll only be using 5 rectangles from each colorway but I used the 3 remaining rectangles for the quilt back).

Each sashing strip was consturcted using my favorite Stack, Slice, Shuffle & Insert Improvisational technique:
- Stack 5 rectangles (1 from each color) with right sides facing up.
- Slice through the entire stack. I kept it simple with 3 slices at varying angles as shown below, taking care to avoid the ends which may get trimmed and/or create bulk when assembling my quilt top. Play with different spacing and angles for interest.
- Shuffle the cut units. Start with the left-most pile and layout in order top to bottom. Take the next pile and skip the first row, and layout units top to bottom, just to the right of the previously positioned units. When you get to the last piece going in the pile, place it in the first skipped row. Continue with each pile, skipping an extra row to mix up the the colors.
- Insert 1" strips of Midnight solid between each unit. Leave a 1/2-1" tail at the start and end to account for different angles. Press strips away from seam and trim even with top and bottom edges of the gingham play unit. Assemble back into rectangles.
Make 4 more stacks and continue slicing, shuffling, and inserting to piece a total 25 rectangle sashing strips (Note: only 24 will be used in the final layout). I like to mix up the order and position of the colors within the 5 stacks to add more variety into the finished rectangle sashing strips.

While in theory the pieced rectangle units should still measure 4" x 10.5" after inserting the 1" strips, this requires accurate cutting, piecing, and pressing of those 1" strips. So I built in a little wiggle room by starting with slightly oversized rectangles(4" x 10.5". We'll trim each pieced rectangle to 3.5" x 9.75". I used blue painter's tape to mark these increments on the underside of my rotary ruler. The blue tape allowed me to visually crop each rectangle unit and trim up two sides. When you rotate the ruler, the tape will nicely butt up against the freshly trimmed edges and you can trim up the remaining 2 edges.

Cutting of Panel and Cornerstones:
- Dino World panels: Carefully cut out nine squares each measuring 9.75"x 9.75" square. There are 8 squares in a 24" repeat, so you will need to purchase an extra repeat (but can always use the leftover squares on the quilt back and/or make throw pillows)
- Roarsome print: Cut two 3.5" strips, and subcut into 16 squares measuring 3.5" x 3.5"

Layout the dinosaur panels into a pleasing 3 x 3 grid. I found myself swapping out blocks as I tried not to have matching dinosaurs or colors adjacent to one another. Place a trimmed improv pieced sashing rectangle between each dinosaur square and all around the outside (again I did some shuffling to avoid the same Gingham colors adjacent to each other at the intersections.) Use the 3.5" Roarsome squares for cornerstones. Asssemble by rows and then connect together into the quilt top center.

For the long spinning borders, I started with two 10" x 52" strips of Dino Dudes, layered facing up. I needed to cut a long diagonal line, but my ruler and mat are not long enough. So instead, I reached for a roll of blue painter's tape to mark a diagonal line stretching 2" from the edge at either end of the strips. Once the tape was in place, it helped stabilize the fabric and I was able to use it as a guide for cutting through both layers.


Five 1.25" x WOF strips of Dinosaur Stripes were cut for the skinny spinning borders. One strip was cut into four 10.5" lengths. A 10.5" length was sewn onto the end of each of the remaining 4 strips and then sewn onto the diagonal Dino Dudes borders. Partial seams were used to attach all 4 spinning borders. 5 strips of the Dinosaur Stripes were cut for the binding.
Inspired by some of the dinosaur spikes and palm trees, an all-over Spikey Bear Claw motif was quilted on my longarm.
Leftover rectangles of Gingham Play, Dino World panels, and any remaining yardage were used for the quilt back.
This quilt would make a wonderful gift for a young Dino Dude or Dudette, but for now it will make for a fun new teaching sample in my Slice of Improv workshops.
Comments
Post a Comment
I am delighted you took the time and thought to leave me a comment. It may take a day or two for your comment to appear as I moderate them prior to posting to filter out spam and inappropriate content. Cheers!