 |
| Fabrics featured in this post were provided by Michael Miller Fabrics as part of my being a Michael Miller Brand Ambassador |
With the Fourth of July holiday right around the corner, I am excited to share this fun, modern take on Red, White & Blue!! Follow along as I share my process for improvisationally piecing this abstract Peace Sign design, that is the perfect size for Quilt of Valor.
Michael Miller's new Bandana Ballad collection provides a classic mix of red, white & blue prints for the background.

Fabric Requirements:
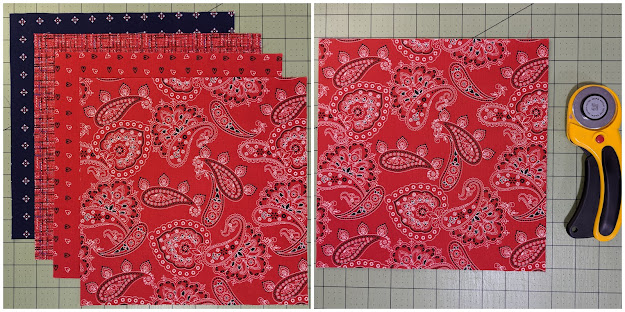
- 1 yard each of 4 different red prints (left pile in the photo below, top to bottom): Spangle, Cross My Heart, Bandana Allover, and Bandana Bauble
- 1/3 yard each of 4 different blue prints (right pile in the photo below, top to bottom): Spangle, Cross My Heart, Bandana Allover, and Bandana Bauble
Cut into 10" WOF strips and subcut into 10" squares:
- 1 yard of red fabrics will yield 3 strips --> 12 squares x 4 fabrics = 48 squares
- 1/3 yard of blue fabrics will yield 1 strip --> 4 squares x 4 fabrics = 16 squares

We'll be using my favorite stack, slice, shuffle, and insert improvisational piecing technique. Choose 3 red squares and 1 blue square and stack into one pile.
Slice through all four layers of your stack by making 3 cuts in this order:
- Center cut (top to bottom: can vary the angles but try to avoid the corners/edges)
- Bottom left branch of your peace sign
- Bottom right branch of your peace sign (which should mirror the left branch)

Now we'll carefully shuffle the fabrics so each block will include a swatch from all 4 fabrics.

I use fast food trays (which you can order via Amazon in different colors and quantities) to help me sort and organize all the pieces into their block layout. I usually start with one stacked section and layout in clockwise order starting with the top left. Then I take the next stacked section, skip that first tray and continue working around in a clockwise order until I work back to that first skipped tray. Continue laying out all 4 stacked sections until you have 4 block layouts that include all 4 fabrics as shown below.

Nearly 2 yards of Bright White Cotton Couture were used for the strip inserts. Strips were cut 1.5" - 2" wide, with the skinnier strips used for the branches. Slide the top and bottom sections apart to identify the gap and cut white strips 2" longer than the gap to accommodate the angles. Piece using a 1/4" seam and white thread. Press open seam and then trim strip even with the background section.


While I don't worry about uneveness along the outside edges, I do like to use a ruler to make a clean cut along the two center lines. This will help make it easier to insert the final white fabric strip (which I usually use wider strips measuring 1.75"-2" wide). Again, add some extra length to your insert strip to accommodate the angles.

As I am attaching the second half, I want to do a quick audition to help match up the intersection of the two branches. In the left photo below, you can see how I used a pin along the intersection to simulate a 1/4" seam. I could open up the two halfs to see how the intersection looked. I will admit that I don't like to pin, but I really don't like to rip out seams!! So I've learned that taking a few seconds to use a single pin along this intersection is a quick and easy way to audition the alignnment. It is just as quick and easy to make small adjustments in the placement of the top unit before piecing the entire seam. Trust me, this is much better than ripping out seams (ask me how I know?!?)


And here is one of 64 pieced blocks...63 left to make. I usually make in batches of 4, taking great care to keep track of all the units. When first starting out, you may want to assemble one block at a time until you develop your system for keeping track of all the units.

The Quilts of Valor Foundation website indicates that a Quilt of Valor is to be large enough to cover an average-sized adult, with an ideal size approximately 60” x 80.” Finished size can be no smaller than 55” x 65” and no larger than 72” x 90.” I chose a 7 x 9 layout for the blocks, which once quilted finished to be 62" x 80" (pretty close to the ideal size listed). Note that you will have one leftover block that can be used on the quilt back and/or to create a label. Alternatively, you could layout all 64 blocks into a 8 x 8 layout, which might be too wide for QOV.

A short doodling session yielded a fun new free motion filler designs that sprinkled in a few stars into my favorite zig zag meander. The quilting was completed on my Gammill Vision 2.0 longarm machine, which went surprisingly fast. There were times it was difficult to see the white fabric against some of the busy blue fabrics, so I used the black light mode, aka party mode, making the stitching much more visible and festive (especially while listening to music in the background).
Another time saver was using Michael Miller's collection of 108" widebacks for my quilt backing. The Daydreamer 108" wideback made for the perfect quilt backing and I was able to load it right onto my longarm without having to piece together the quilt backing!!

And here you have the finished quilt, bound in the white Spangler print.
 |
| Finished 62" x 80" |
I'd love to hear your suggestions for a possible quilt title to name this quilt. Leave me a comment below!!

Chicken scratch!
ReplyDeleteYes! I've heard they look like chicken feet! It all works!!
DeleteWhen I saw this I thought "Why and Why not". This looked like a Y. I'm going to do this pattern. I need a soldier quilt and I have lot's of scraps and I feel it will work great. Thank you for sharing.
ReplyDeleteOooh--I like that interpretation too!! I've made smaller versions starting with 6.5" squares and 1-1.5" strips and it looks just as great! I'd love to see a picture of your finished Why and Why Not Quilt!!
Delete