 |
| Fabrics featured in this post were provided by Michael Miller Fabrics as part of my being a Michael Miller Brand Ambassador |
Back in May, the Michael Miller Fabric Brand Ambassadors were presented with a variety of precuts to use for our projects. I love black and white prints and immediately requested the Black and White Fat 1/4 Bundle which included 20 black and white prints (stripes, dots, flowers, and more!) and added 1/3 yard cuts of some super bright basics to create an improv quilt:
- Krystal: Sunshine, Fuchsia, and Stream
- Hash Dot: Fuchsia, Yellow, and Stream
- Garden Pindot: Magenta, Sunshine, and Stream

Follow along as I share my process for adapting this design into the quilt below using improvisational stack, whack, shuffle, and topstitch applique!
 |
| Polka Dots & Posies, Finishes 57" x 65" |
Fabric/Supplies:
- 48 squares measuring 10.5" x 10.5":
- 24 cut from black & white fat quarters (include a mix of light, medium, and dark values)
- 8 cut from Magenta/Fuchsia fabrics (Krystal, Hash Dot, and Garden Pindot)
- 8 cut from Yellow fabrics (Krystal, Hash Dot, and Garden Pindot)
- 8 cut from Blue fabrics (Krystal, Hash Dot, and Garden Pindot)
- 8 black and white squares measuring 8.75" (using leftover fat quarters and/or 10" squares)
- 1/2 yard for binding (I used Michael Miller's Black and White Clown Stripe)
- 3.75 yards for your backing (I used Krystal Sunshine)
- Elmer's White School Glue
Stack and Whack Cutting:
Layer and stack 4 squares right sides facing up. Each stack should include two black & white prints and two different colors/patterns.
Use a sharp rotary blade to free-hand cut gentle wavy quarter circles through all four stacked layers. Extra rulers were used to help prevent the layers from shifting as I cut.
I am right-handed so I started cutting the outer curve at the 9" mark along the bottom of the stacked squares around in a wavy quarter circle to the 9" mark along the left side of the stack. Left-handed quilters may opt to rotate their mat and cut from the bottom left to the right edge.
Turning Edges Under:
Place the center and middle ring units with the backside facing up and gently turn under the outermost edge on each unit. Use your fingers to turn over approximately 1/4" (or more) and follow with a hot dry iron. The bias will provide the stretch you need to achieve smooth convex and concave curves.
Layer and Assemble Blocks:
Now that your inner and middle sections are prepared, we'll shuffle and layer into finished blocks. I alternated each layer between a black and white print with a colorful print. Start with the smallest section with the turned edges facing up and apply a small, thin line of glue along the turned under edge. Slide the middle section right side facing down to overlap and cover all the turned edges on the smaller section. Use a hot dry iron to heat set before applying glue to the next turned edge curve. Slide the last section on top, again covering all the turned edges. Use a hot dry iron to heat set all the glue basting.
Top stitch within 1/8-1/16" from turned edges using a slightly longer stitch length with the option to use matching thread colors in 50wt. I loaded one color thread and top stitched all the units in that color before swapping out threads.
Layout:
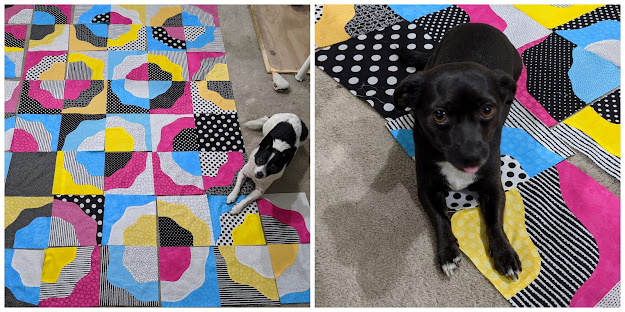
Here are some of the rules I established for laying out the blocks into a 7 x 8 layout:
- One solid square of fabric per row and column for a total of 8 solid squares in your quilt top Think of it as a giant Sudoku game or use the layout below as a guide.
- Alternate backgrounds across each row and column (ie. black and white, color, black and white, color...)
- Include a pink, blue, and yellow fabric in each completed ring
- Avoid having duplicate fabrics within each ring or touching each other (ie. corners or adjacent blocks)
I probably drove myself crazy with these rules as there was lots and lots of swapping out blocks which then caused a change reaction of additional changes needing to be made in order to comply with my design rules. Thankfully my two black & white studio assistants (Panda on the left and Callie on the right) were available to assist with this process. They were especially involved with the randomization as they burst into play mode on multiple occasions, thereby moving around several of the laid out blocks.
Finally I committed to the layout (aka gave up!!) and proceeded to sew all the blocks together into rows and the rows into a finished quilt top. Yes, I suspect there are a few areas where I may have broken my design rules...but rules were meant to be broken!
Quilting/Finishing:
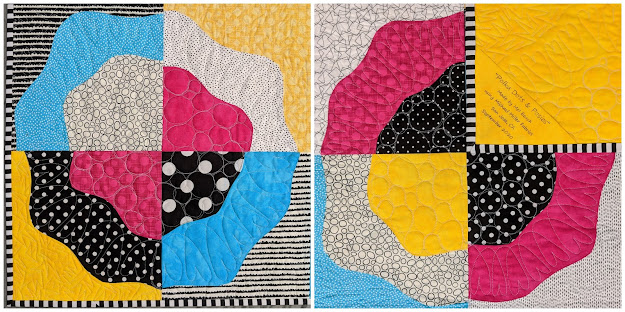
I loaded the quilt top onto my Gammill Vision 2.0 Longarm machine along with a cone of Superior's Omni white thread for quilting. Using the blacklight option making it easier to see my stitching against the white fabric and created a festive party atmosphere! I doodled a few different designs before arriving at this motif combo:
- Pebbles filling each center
- Loop de loop hearts around each ring
- Zig Zag meander for the background
When I arrived at a solid square, I stitched the wavy lines to complete the ring and then filled in each section with the corresponding motif.
Once I completed the quilting, I pulled it off the frame, and realized there were two solid squares where I forgot to go back and complete the background stitching. Safety pins helped to mark these two small sections to quilt on my Juki TL-2010Q domestic sewing machine.
Black and White Clown Stripe made for the perfect binding.
Most of the West Coast is experiencing wildfires and/or smoke and ash from wildfires, which added an extra challenge to photographing my finished quilt. On Wednesday and Thursday, we had ash falling from the orange skies and very little sunlight. On Friday, the orange haze was gone, but the air quality was still unhealthy and there was an ash coating on our cars and backyard furniture. So a grey sheet was laid down to protect the quilt. I wore a N95 mask as I climbed up a ladder to take photos. I couldn't resist capturing a selfie during my photoshoot.


You've created a charming, fun quilt. Thanks for the instructions, too.
ReplyDeleteThanks Ann...it was a really fun quilt to design and create, especially with this vibrant palette of colors and patterns!! I may be keeping this one for myself as I love it!!
DeleteWhat a fun quilt! It is so colorful and full of prints - too loud but also so very right :) xo Melanie
ReplyDeletewww.mellmeyer.de
Thank you! I am very much drawn to vibrant colors and cannot resist a good black and white print!
DeleteThanks for the step-by-step photos and directions. I'll be borrowing this technique!
ReplyDeleteYou are most welcome! I look forward to seeing what you create using this technique!
Delete