Week 2 of 100 Days of Mark Making continues my daily exploration of using different products and techniques on 10" squares for a total 38 squares or 2.5 yards of black and white designs. Join me as I share more about each of these experiments.
Circle, circle, dot, dot, waiting for my cootie shot!
Today's trio of mark-making experiments uses Jacquard's Lumiere Super Sparkle acrylic paint and 3 different applications to create triangular designs:
Wavy and spiral scribbles were doodled onto dampened PFD fabric using black and white Derwent Inktense blocks. A wet paintbrush was then brushed over the design to cause the pigment to flow.
After doing my first roll across the fabric, I loaded on more paint and rolled perpendicularly to create a grid. More circles were stamped onto the second grid fabric.
Wheee!! Making waves with my new Gelli plate, Golden acrylic paints, combed rubber squeegees, and sequin ribbon!!
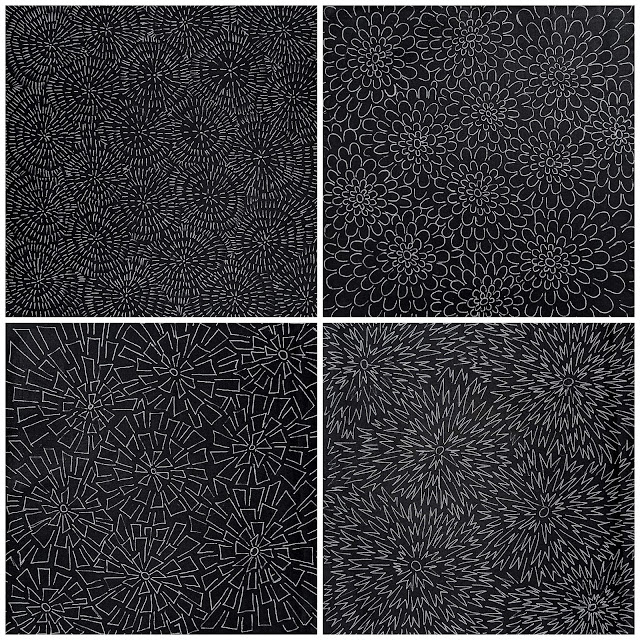
Bursting with with mark-making designs and ideas using a white Uni-ball Signo pen on black PFD. Initially I started with a single dot surrounded by rings of dashes. Thanks to the meditative nature of making all those dashed lines, I wondered what would happen if I doodled Us instead of lines?...angular U's that morphed into staple shapes?...and perhaps Zig Zags? These are among some of my favorite fabrics yet!
8/100: Markers + Circle/Dots
Midnight mark making using an assortment of markers: Ultra Fine Sharpie, Sakura Identipen, Tsukineko Fabrico, and Tee Juice.
9/100: Fabric Paint + Triangles
- Painting with Fantastix (left)
- Stamping using a pizza saver (middle)
- Brushing over a stencil (right) --was pleasantly surprised at how crisp the design after repeat use without washing in between!
10/100: Watercolor Blocks & Wavy Lines/Spirals
Derwent Inktense blocks + a splash of water = wiggly lines and spirals!
11/100: Artist's Choice (Fabric Paint) + Artist's Choice (Cardboard Tubing/Twine)
Fabric painting by wrapping string around cardboard tubing, along with a PVC ring, and a foam marshmallow thing! Gotta love all that amazing texturizing!! Not too bad for dice rolling!!
For my Artist's Choice, I wrapped some twine around a cardboard tube and secured both ends with some clear tape. Initially I had planned to roll the wrapped tube into Jacquard's Neopaque paint but I found it was easier to simply brush the paint onto the twine. The painted tube was laid onto my fabric with some light pressure and rolled across the length of the fabric. I absolutely loved the patterning and texture, so I saved the wrapped tube for future printing!! A PVC ring and a marshmallow-shaped foam was used to stamp additional circles and rings on top.
12/100: Watercolor Crayons + Lines
Today was my day to test out my new Maribu Art Crayons and they are amazing! They glided across the PFD fabric as I was drawing parallel lines. Tonight's experiments involved seeing how these wax-based watercolor crayons responded to being brushed with water vs. aloe vera gel.
In the top right photo below you can see how the water quickly interacted with the pigment and bled along the left lines. This is not necessarily a bad effect, but proved to be difficult to control the pigment flow. Whereas the aloe vera gel made it possible to smooth and move the pigment easily with a paintbrush along the right lines.
This discovey led me to explore drawing overlapping lines and using the aloe gel to fill in the various shapes. The gel was brushed along the painted perimeter followed by brushstrokes from the perimeter in towards the center.
Wow! I absolutely love the precision that is possible when used with aloe vera gel. I will be revisiting this combo again!
13/100: Textile Paint + Wavy Lines
14/100: Pens + Artist's Choice (Starburst Designs)
As I post daily to Instagram, several comments have inquired about the permanence of these marks. I press each square using a hot, dry iron (usually with a pressing sheet to prevent marks transferring onto my ironing surface--so far no issues!). Whenever possible, I look up the product information regarding heat setting but some of these mediums are not necessarily designed to be used with fabric, so more experimentation will be required to see whether these designs are truly permanent on fabric and how they would hold up to washing. However, my plan is to use some of these fabrics in 4 or more art quilts--and will likely use fusing, so water and washing are not a strong consideration for me at this time.
This concludes my first 2 weeks of mark making with a whopping total of 6+ yards of mark making fun! While I've been focusing on black and white designs these two weeks, I'll be introducing the color red into the mix for the next 2 weeks. So stay tuned to see what's black, white, and red all over!
 |
| Days 1-14 of Mark Making Magic! |


Comments
Post a Comment
I am delighted you took the time and thought to leave me a comment. It may take a day or two for your comment to appear as I moderate them prior to posting to filter out spam and inappropriate content. Cheers!