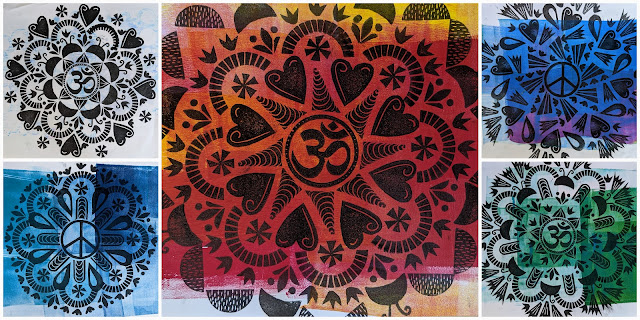
There hasn't been much, if any, quilting in months. Instead, I've been taking a break to recharge and play with a variety of mixed media techniques: carving, stamping, and gel plate printing. It's always fun to explore new mediums and techniques. I especially enjoyed using my growing collection of hand-carved blocks to print these mandalas. For each new mandala, I challenged myself to combine different stamps to generate all new mandala designs.
SAQA's "Reflections on Spirituality" virtual art call description certianly intrigued me: "What do you do or where might you go when you seek a bit of peace and quiet introspection? Whether in a cathedral or a meadow, with a group of people or expressed in solitude, this exhibition asks makers to share the moments and rituals that nurture their souls and calm their spirit."
Inspiration finally struck 8 days before the July 31st entry deadline. Over the past 2.5 years, yoga has been a wonderful source of peace and strength. As I reflected on my yoga practice, I brainstormed a few different ways to translate this into an art quilt. One wild notion was to incorporate an actual yoga mat into my entry. This presented a whole host of technical questions and concerns which I will share, along with design inspiration, materials, and a bit of troubleshooting required along the way...

While I had an older yoga mat on hand I could use, the light pink color didn't play well with the variety of fabrics I had pulled for use. So the next morning I went yoga mat shopping. Usually Marshalls carries a large selection of fairly inexpensive yoga mats, but I could only find a light cream color and another pastel pink. So I went to a Sports Basement, where a very friendly staff member tried to provide a bit of education on the different yoga mats while guiding me to some of the thicker ones that would provide better grip and support. I felt a bit guilty for telling her of my plans to incorporate it into an art project, hence my need for a fairly thin and inexpensive mat.
Later that afternoon, I got to work faux-dyeing swatches of Evolon with jewel-toned ProChem Pro Silk & Fabric paints. To create a mottled look, each swatch was soaked into water, scrunched into a plastic container before applying small amounts of two or more paint colors. The cups were placed outside for an afternoon of baking in the hot sun, but they were still very damp the next morning, requiring them to be hung up to air dry.
These beautiful treasures were certainly well worth the extra time and effort...
I just love all these splashes of color and texture!
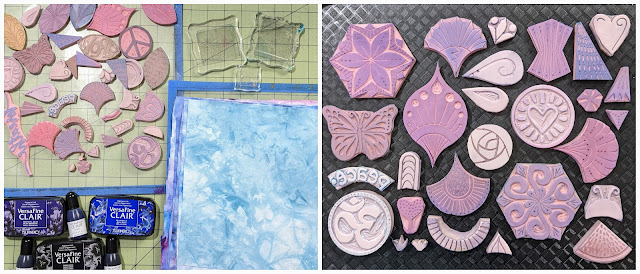
Later that evening, I gathered an assortment of my hand-carved blocks and Medieval Blue Tsukineko VersaFine Claire ink for mandala printing.
On a painted piece of evolon, I start in the center and stamp one ring at a time. These are completely improvised with no planning ahead. I absolutely love being in the moment and letting each mandala grow with pattern, repetition, shapes, and texture! Just like the mandalas printed onto paper, I challenged myself to explore new combinations and designs. Enjoy watching these time-lapsed videos of my mandala creations:
Mandala #2 and
Mandala #3.
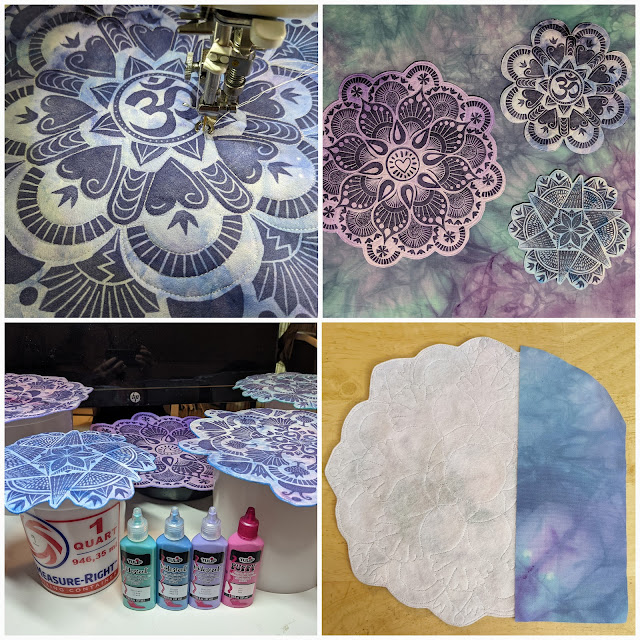
I thought it would be fun to incorporate a few smaller mandalas, but I only had one swatch of painted Evolon left. By attempting to fit three smaller mandalas onto the last swatch, I quickly realized they crowded each other and left them unusable. Luckily the Evolon is thick enough that I could turn it over and stamp a larger mandala onto the backside, starting with my favorite of the three mandala designs.
As this was a yoga-themed art quilt, I wanted to include a tree pose as the focal feature. I struck my best tree pose for a photo shoot. When I went to project my tree pose onto one of the few blank walls in our home, I couldn't move the projector far away enough to fit in the same vertical orientation. But we quilters are always resourceful and I found a work around by rotating the image 90-degrees to fill the 65" yoga mat!
The image was traced onto a piece of Christmas wrapping paper with the white side facing out. I suspected a permanent marker was likely to bleed through the paper onto the walls and so I first started with a pencil and then transferred to a pen. Imagine my surprise when I went to take down the wrapping paper and disovered a technicolor outline of me on the wall! The pencil and pen lines transferred the colors from the Christmas design onto the white walls. While it is difficult to see in the photo below, trust me that it is defintely visible in real life. So now I have some interesting mark-making art in my front foyer!!
Next up is some intentional mark-making via a newly hand-carved stamp inspired by my daily yoga practice which typically concludes by saying "Namaste" which can mean:
- literal translation: "I bow to you"
- an expression of appreciation and respect towards another
- "the divine in me honors the divine in you"
- a greeting: hello and/or good bye
While the prints above are all stamped onto paper, my plan was to print onto a silk organza overlay. Below are a few of my experiments with a variety of mediums, which included gel pens, inks, and acrylic paints.
While printing on the organza, I felt like Goldilocks in which the various marks were either too bold or too subtle. But with each experiment I was able to find the perfect combination of white acrylic craft paint blended with some of the Color Shift and Dazzling Metallic paints for use with stenciling and stamping.
A large blank piece of fabric is always intimidating at first, but once you add those first few marks, the creative juices start flowing and you are completely immersed in the process. So much so that I forgot all about the wicked headache I had all day!
The first few additions were mandalas stenciled on using white and pearlescent paints. Next up was block printing with a few of my hand-carved stamps with a yoga connection. This was the first time I used a Stamp Buddy by ArtFoamies to load up with acrylic paint for stamping--which worked amazingly well to get a subtle variation in each of my stamped designs.
Once again, the first few stamps were the hardest so I started with clusters of the breathe stamp and found myself taking deep breaths with each print. It was fun to layer little groupings of the various stamps across the fabric using a range of pastel jewel-tone paints. Can you tell that I was totally in element during this printing session? It was a sheer delight!
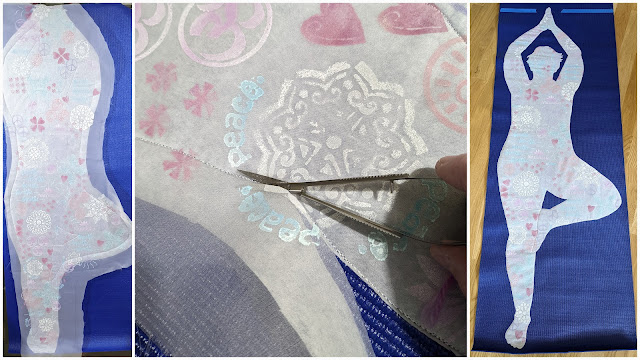
Originally I had planned to layer the organza directly onto the yoga mat. While auditioning placement of the tree pose figure, I layered the printed organza over the Christmas wrapping paper silhouette and absolutely loved the layered look. Not only did I prefer the look, but it resolved a few of the engineering challenges that had concerned me. I searched for a few white on white printed fabrics but ended up using this semi opaque webbing material I had on hand in the studio.
The next engineering challenge was the actual quilting through a yoga mat. While a yoga mat's sticky grip is awesome for helping you to hold poses, it's an absolute nightmare for free-motion quilting!
Quotes from the studio tonight: "
If I ever get the hare-brained idea to quilt a yoga mat...stop me." I did a bit of testing on a corner of the pink yoga mat, which wasn't too bad. But pushing/pulling a 24" x 72" yoga mat was an entirely different story, especially as I was outlining the tree pose, which required quite a bit of maneuvering and wrangling. Thanks to some clever engineering, a very helpful engineer partner, and my trusty Juki TL-2010, I was able to quilt through a yoga mat, although I'm going to need a massage!
Once the tree pose was outlined, I used my thread snips to trim away the excess fabric to reveal my yoga pose.
The next step involved auditioning placement of the various stamped mandalas to float around the tree pose.
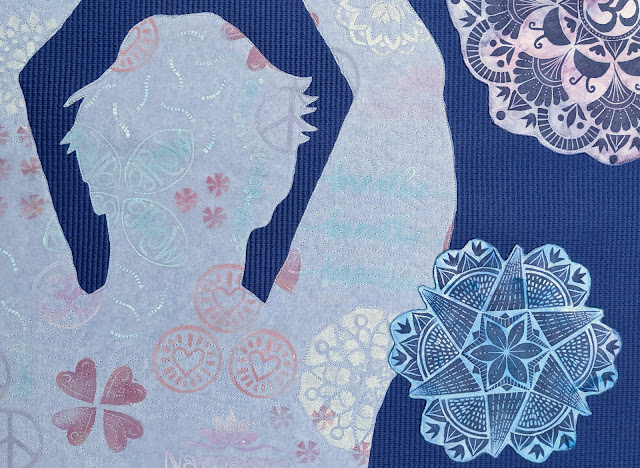
A few of the mandala designs went off the edge of the mandala which required a bit of overlapping. The large purple mandala just above the bent knee was cut off at the top and bottom and really limited my design options. Instead of eliminating it from the design (especially since it was one of my favorites), I painted a larger swatch of Evolon and stamped the design again preserving all the edges!
Each mandala was layered with a fusible batting and free-motion quilted to add stitched texture without detracting from the stamped designs. As a few of the mandalas would float off the edges of the yoga mat, I fused a strip of hand-dyed fabric to that section, and then trimmed the edges of each mandala very close to the stitched line. The raw edges were then finished by applying a thin coat of Tulip dimensional paint (aka Puffy Paint).
The next day involved more free-motion quilting on the yoga mat which went much better thanks to my new-and-improved system involving binder clips to better manage the yoga mat. While I very rarely roll my quilt tops for quilting in this case, it was easier than "smooshing" the mat. Small scraps of batting were used to prevent the clips from leaving indents in the yoga mat. Not until I was finished did I see the text on the clips. Their messages definitely channeled some positive energy into today's quilting session.
The night before the deadline was all about the final assembly. Crazy glue was used to baste the mandalas in place prior to free-motion quilting along the edges. I rounded up the biggest and heaviest books in my quilting library to maintain contact with the yoga mat until the glue was completely dry. More glue was used to folder over the top of the yoga mat to create the 4" quilt sleeve.
The last step was to remove all the tear away stabilizer used on the back to minimize drag! And I confess there are still a few more bits that need to be removed...
And by Sunday afternoon with several hours to spare, I wrote my 500-character artist statement and submitted my photos to the "Reflections on Spirituality" art call. It will be a couple of months until I learn whether it is accepted into the virtual exhibit, but either way, I really enjoyed this prompt to combine my love of free-motion quilting, stamping, painting, and yoga.
 |
| "Mind Over MATter", Finishes 24" x 68" |
Artist's Statement:
My daily yoga practice is a treasured gift to myself as it stretches my body and mind. Every yoga session begins by unrolling my mat and shifting focus to my breathing. With each exhale, I let go of external distractions. As my lungs fill with the next breath, I find the balance and strength needed to hold a pose or twist my body even further. As my quilt studio doubles as my yoga studio, the various yoga flows unlock my creativity and stretch my fiber art in exciting new directions. Namaste!









Another amazing and informative post of your very creative projects. I look forward to reading your monthly posts. Keep up the very creative and skillful creations! I know you can't stop!
ReplyDeleteAwww...thank you Jeanne. I am so glad you are enjoying these blog posts. I certainly have fun stretching my creativity with new skills and techniques.
DeleteWhat an amazing piece of work! Thank you for sharing the process with us.
ReplyDeleteThank you--I am so glad you enjoyed learning more about the process as it made for a fun week!
DeleteI remember a quilt that Ruth McDowelll and her small group made/quilted years ago where they used their outlines as the quilting design. This is even better! You are so inspirational, Mel. Congratulations.
ReplyDeleteThanks Ann---I hadn't seen the Ruth McDowell/small group quilt. I will have to do some reconnaissance. But yes--using your own figure is certainly a challenge in itself. Seeing myself in the front foyer during the design process, the etched outline, and now the finished piece has been interesting!
DeleteFANTASTIC! I love it!
ReplyDeleteThank you! It made for a super interesting week of combining my many passions!
DeleteGosh, I love how your mind works! Thank you for sharing your process. Absolutely amazing.
ReplyDeleteAww...thank you Molly. My daily yoga practice has really helped clear my mind to explore new designs and inspirations. It was fun to celebrate it in my quilting!
Delete