This week's Project Quilting challenge theme is A Novel Project inciting participants to make a project inspired by books we've read. Oooh--so many possibilities!
On Wednesday I listed some of my favorite books: Anne of Green Gables, The Little Prince before remembering The Giving Tree by Shel Silverstein (which you can listen to in Storybook Nany Read Aloud here). I found my copy for a quick read. Of course I misted up as I read about the Giving Tree and the little boy that would come visit her to "gather her leaves...climb up her trunk...swing from her branches, and eat apples."
A variety of fabrics from my mark-making experiments were combined with showroom fabric swatches that
FabMo saves from going to the landfill and makes available to the local community for a very nominal purchase price (or completely free in their Priceless Treasures room!) An assortment of threads, trims, and embellishments were added to the mix.
The Spotlight Auction pieces are displayed in mats with a 4.5" x 6.5” opening, so I find it helpful to recreate these dimensions on my ruler to help with the design planning. Of course I quickly realized there was no way I would be able to fit all those fabrics/trims into my piece, so some serious editing would be required!

I started forming the tree trunk using a brown batik fabric and a small swatch of upholstery fabric that resembled woodgrain that was layered below the batik. A small heart template was cut out of contact paper and placed over the small swatched area. A variegated brown/gold yarn was couched with free-motion quilting, outlining the heart first before filling in the background with a tree bark motif. I started with a Juki echo quilting foot which hovers over the surface, before switching to my open toe foot and guiding the thread an inch or so ahead of the needle. Once the stitching was complete, I removed the heart template and used my fabric snips to trim away the batik to reveal the wood grain fabric hidden beneath the surface.
With my tree trunk prepared, I narrowed down the fabric palette for creating leaves and apples.
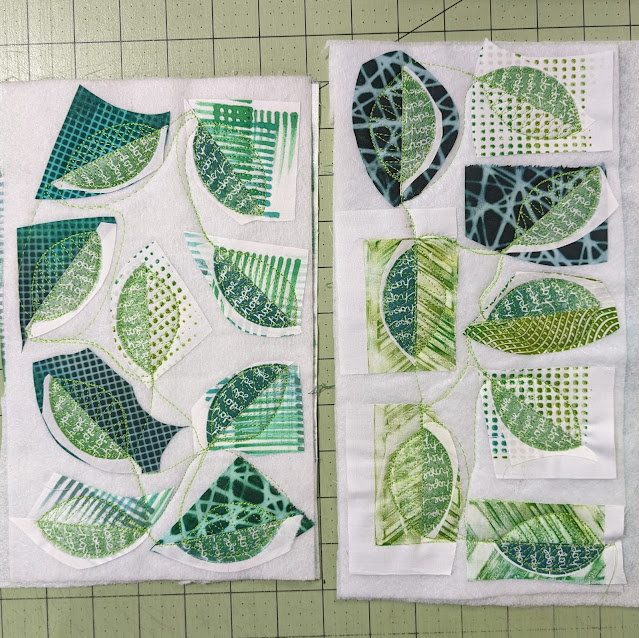
These leafy green fabrics all started out as white fabric previously transformed with several of my favorite mark-making techniques: block printing, gel plate printing, and sunprinting.
The top center leaf prints were cut in half and fused on top of a contrasting green swatch to create two-toned leaves that were fused onto Pellon fusible fleece. Free-motion quilting was used to outline each leaf and midrib before adding zig zag motif for the veins. To achieve dimension with my leaves, I used wire cutters and pliers to create a twisted loop of floral wire structure within each leaf. As a precaution, electrical tape was wrapped around the cut ends to prevent them from cutting or piercing through the leaves. These wire spines were centered onto the backside of the quilted leaves and fused into place with a small swatch of Heat n Bond Ultra Hold fusible web.
Care was taken taken to keep the wire and fusible away from the edges which would require another round of top stitching. Once fused into place, another layer of fusible fleece and backing fabric was fused onto the backside before completing two final passes of topstitching around each leaf's perimeter.
Once the individual leaves were trimmed, a leaf pile was formed.
In addition to laying out my quilted leaves, I couldn't resist playing with the leftover negative space. I was intrigued by layering the cutout sections and took photos for future experiments. As I was taking the photo, I realized that one of the quilted leaves was left behind!
The leaf edges were finished with Tulip puffy paint aka dimensional paint...one of which was Leaf Green...how perfect! The leaves were then carefully propped up onto a small spool of Aurifil thread while the painted edges dried.
Once dry, I was able to bend and curl the leaves to create even more dimension!!
Now it was time to prepare my apples. There were some Cosmic Crisp apples in the fridge that I photographed and printed to use as both design inspiration and as a quilting template.
The quilted apples were trimmed and painted.
Now that all my elements were prepared, it was time to figure out the final composition. I tried to multitask during a few morning Zoom meetings, but this stage required my full attention. Ironically, high levels of tree pollen triggered my allergies in the afternoon, postponing my layout play until after dinner. I made extra bits to provide options, so again I needed to edit, edit, edit.
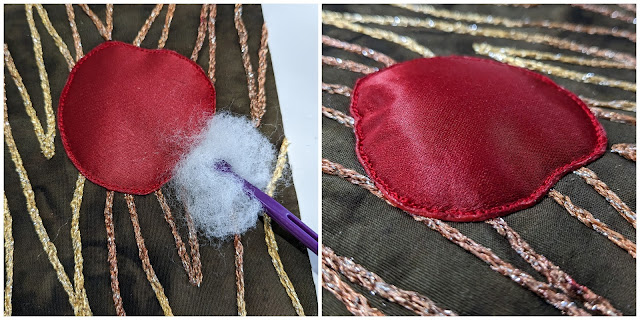
The apples seemed kind of simple as compared to the leaves, so my friend
Sarah Goer suggested stuffing the apple to add more dimension. At first I was hesitant as the edges were already finished, but with a bit of engineering, I was able to stitch the apple onto the background and top stitch 3/4 around the edge leaving a small opening to add stuffing before completing a final pass of top stitching to close.
After evaluating the many layers that would need to be stitched in order to attach the leaves, I opted for finishing by machine.
The apples were a bit plain as compared to all the other elements. The apple scraps were perfect for auditioning Uniball Signo pens to add dotted accents and highlights. One of the leftover apples and pair of leaves were used to create a label that hangs from the backside.

Here are many of the fabrics, paints/pens, threads, and other supplies used to create my finished piece...
I'm really pleased with my quilted interpretation of this childhood favorite...
This piece will be available for online bidding as part of the SAQA Annual Conference
Spotlight Auction that will conclude on Saturday, April 29th. All proceeds will help SAQA promote the art quilt worldwide. I'll be sure to share more information about the Spotlight Auction as April approaches so you can scope out all the incredible art quilts that you can bid to win...including "UnbeLEAF-apple!"
 |
| "UnbeLEAF-apple!" finishes 6" x 8" |
Looking to add new books to your reading list? Be sure to check out all the incredible book-inspired entries started and finished this week.


wow - I love the work on this. The end result is gorgeous!
ReplyDeleteThank you... there were lots of technical challenges to sort out along the way but it was a joy to celebrate one of my favorite books!
DeleteThis is absolutetly stunning! Every challenge I look forward to seeing what you come up with and the process you share!
ReplyDeleteThanks Kim...I thought of you and your family's apple orchard while working on this piece. Another fun challenge with lots learned along the way--thank you for being a fabulous host!
DeleteSEW very cool and a very clever quilt name, too!!!
ReplyDeleteThank you--I had fun making this project, including the punny title. Some are punnier than others!
Delete