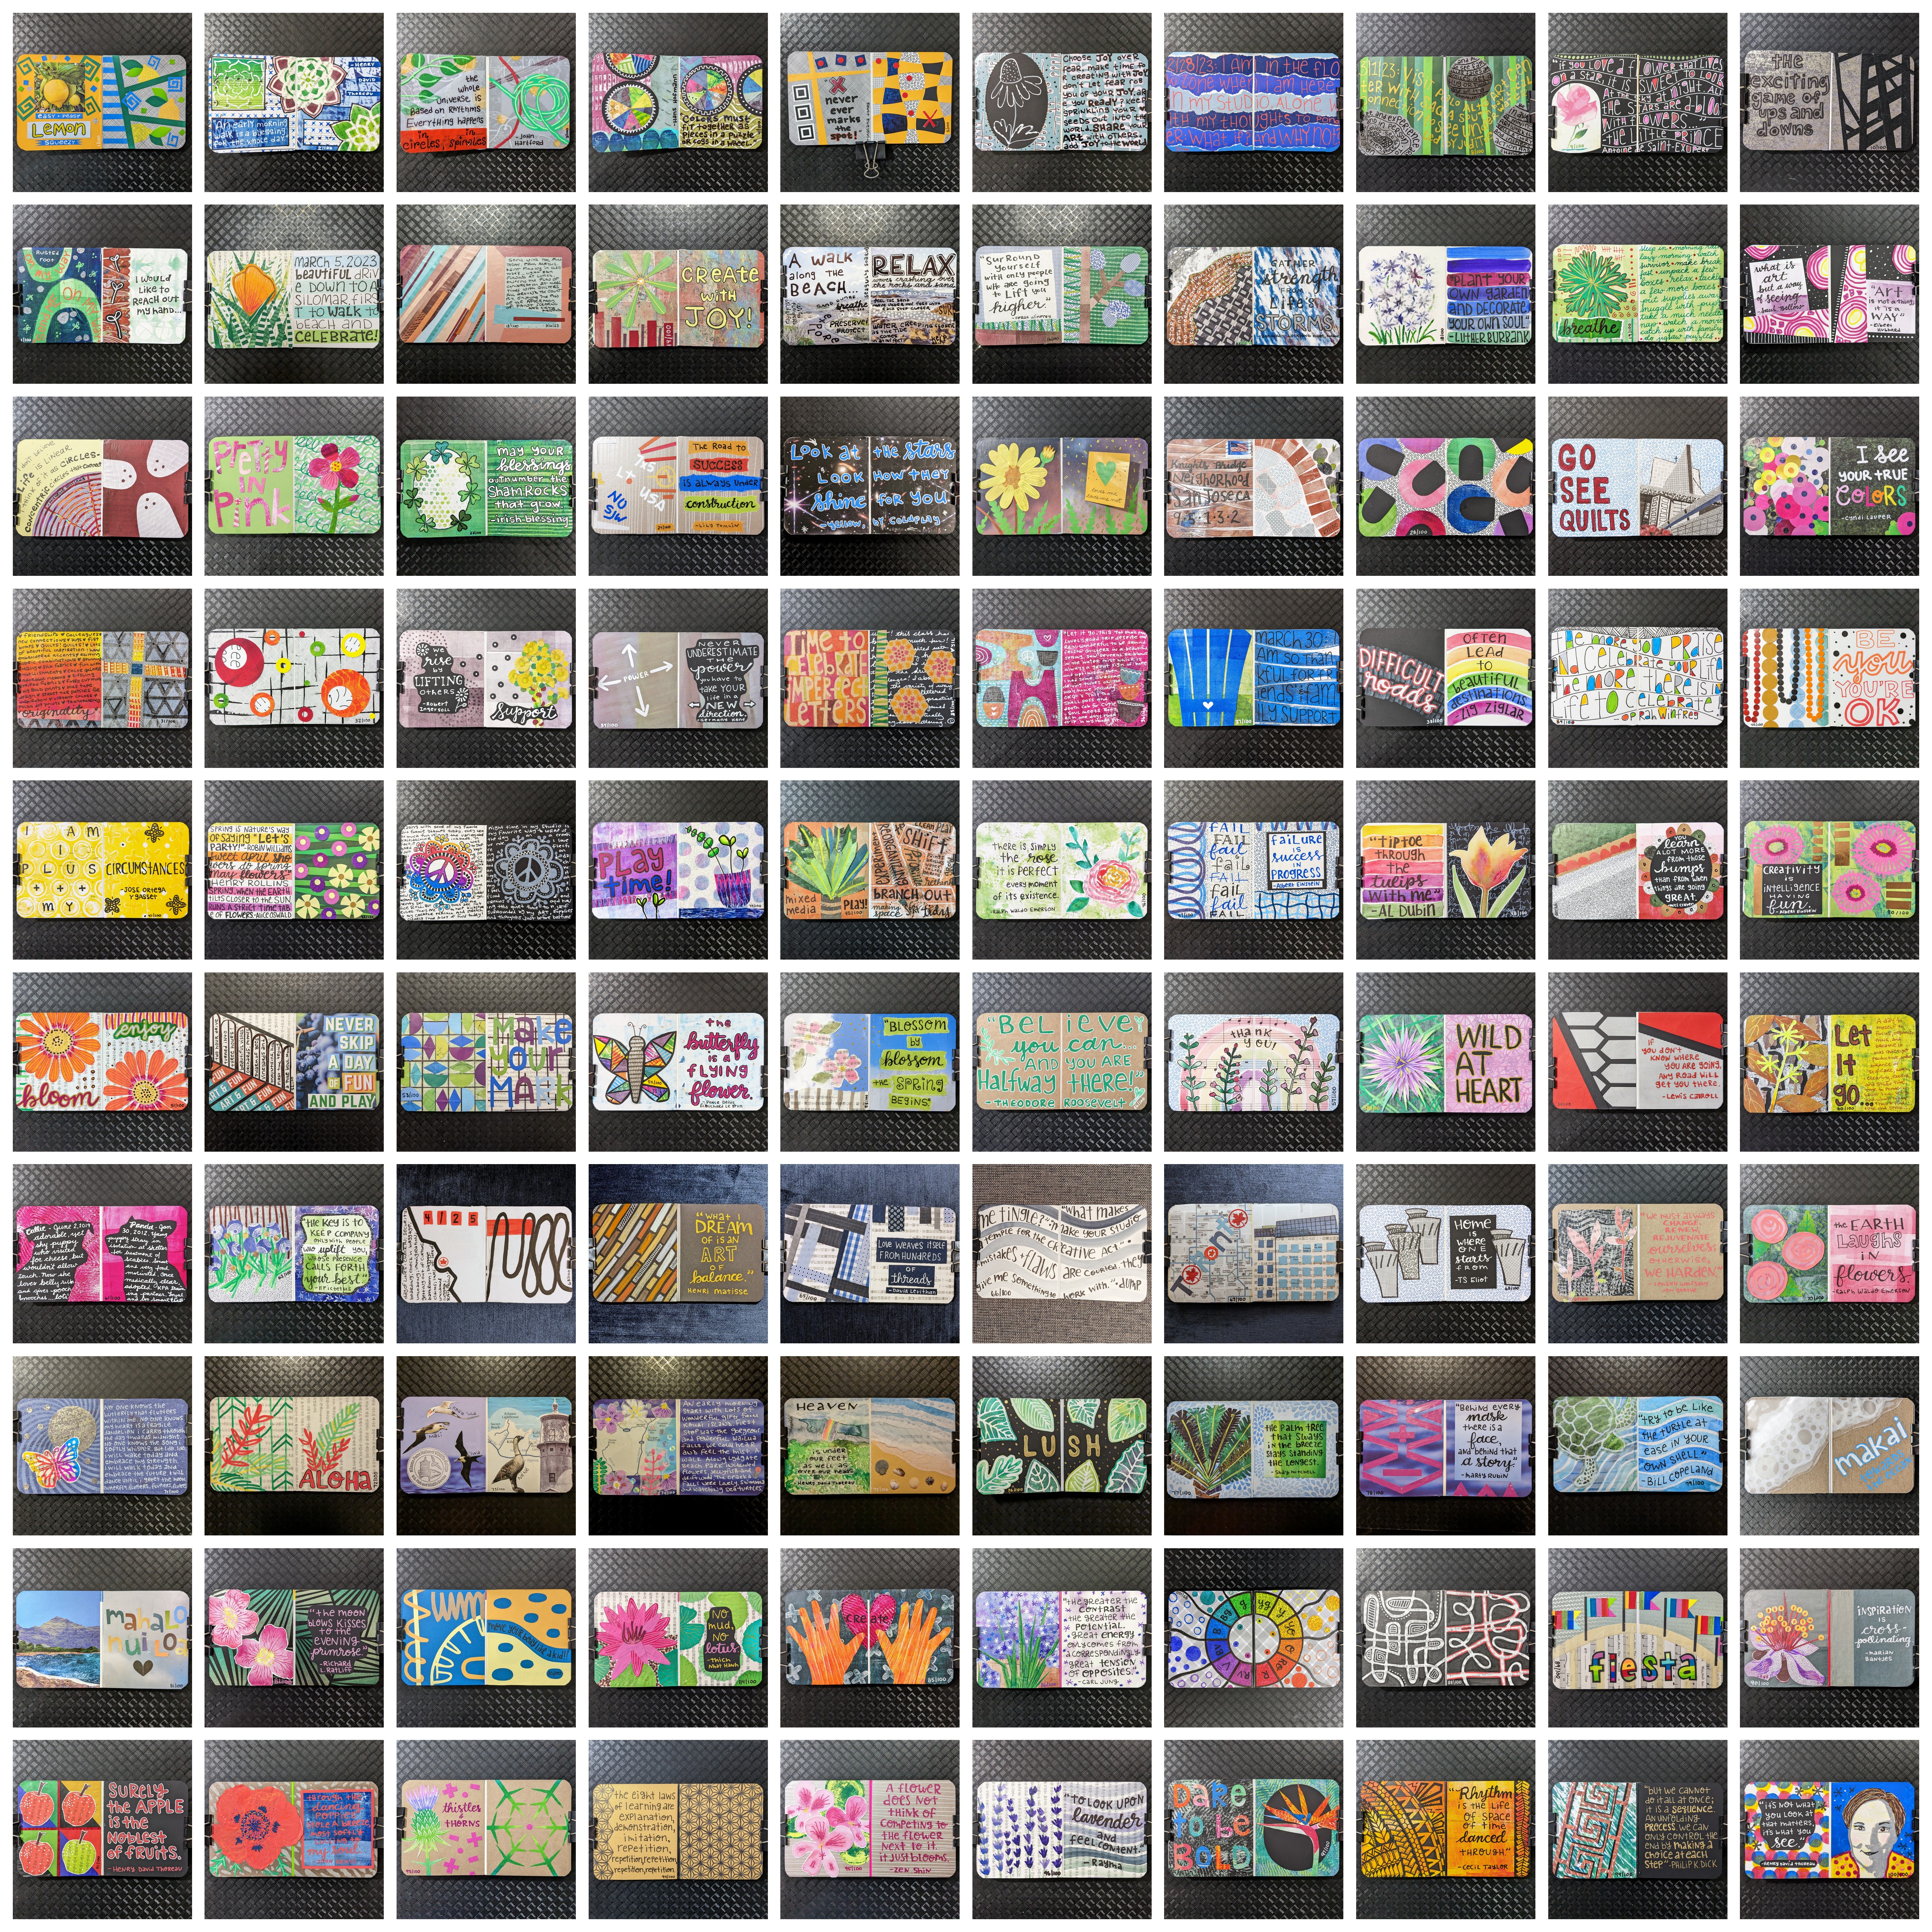
100 Days of I Spy Dice Designs: Celebratory Wrap Up & Reflections on Fodder, Tools, Techniques, Organization/Storage, and Travel

In my earlier blog post, I reflected upon design inspiration discovered throughout my 100 Days of I Spy Dice Designs. In this post, I will focus more on the sources of fodder, materials, tools, techniques, and organization to support my creative process. I received quite a few questions about the what and how I was creating especially while traveling, so I hope this blog post helps answer a few of your questions!

Collaging Into Children's Board Books

Using children's board books for my I Spy Dice Design books was inspired by Drew Steinbrecher's free online, class: Build your Creativity: Board Book Basics. Used board books are readily available at thrift stores in a variety of sizes and shapes. For this series, I used this "My First Library" set as there were 10 books, each with 11 page spreads, plus they were very small and portable. I will confess that this smaller size definitely challenged me, especially at the start when I had originally planned to include the inspiration photo, text, and artwork all within each day's spread. By Day 3, I scrapped that plan and included a mosaic of all the inspiration photos in the first two pages of each book. This freed me up to use the full 7" x 4" spread to focus on text and art as inspired by the photo.

I was amazed at how much each book grew with each daily collage. Only 6 finished books fit into the original box. In Drew's class, he shares how he cuts open the book spine to allow for this growth. When it was time to finish my book, I used a length of duct tape to wrap around and reinforce the spine before covering with gel prints. A bone folder was used to fold the papers to snuggly wrap around from the back to the front. Reptile Primum Craft Adhesive was then used to affix the covers and mosaics. 

Rolling the Dice to Determine Fodder Used

Over the course of the 100 days, I rolled two dice. One die determined design inspiration, while the other determined what kind of fodder I would incorporate into my layered collage. Other fodder sources were also permitted, but this provided an opportunity to experiment with different kinds of fodder bits! Fodder is pretty much any kind of paper/medium that can be used in an art collage. Below are the different dice rolls, how many times I rolled them, examples of the fodder used, as well as daily spreads showcasing that particular fodder source! 

1. Junk Mail/Flyers-16 rolls

I took greater interest in my junk mail throughout these 100 days, especially the patterned linings of security envelopes. Now I find myself silently judging companies and organizations on their envelopes and feel disappointed by boring, plain envelopes! Here are just a few of the pages featuring patterned security envelopes. 


2. Packaging-16 rolls
Packaging used in my 100 day project included single use plastic bags, paper bags, tissue boxes, food labels, toilet paper wrapping, and more. If it had interesting swatches of color and/or pattern, I would hold onto it for future use in my daily spreads and on multiple occasions I raided the recycling bin for much needed fodder. I even unwrapped some of my canned goods to find the right color swatches--although I made sure I labeled the can first and then taped the cut up label before returning the can back to the cupboard! While traveling, I saved little bits of wrapping from the hotel room, meals, etc, just in case! Even paper bags and cardboard boxes made for blank canvases to create using different mediums!

3. Books/Magazines-18 rolls

This was a pretty big category with lots of versatility. These IEEE Spectrum magazines were from my partner and had lots of colorful graphics. Travel brochures gathered in hotels and airports were also included in this category and were a fun way to celebrate my travel adventures. Here are a few spreads featuring glossy magazines and travel brochures.

I purchased several used books from local thrift stores for fodder including books with music and foreign text. They added visual interest to my backgrounds, especially when layered with watercolor painting!

4. Made Fodder--Gel Plate Prints-15 rolls
These dice rolls were the perfect opportunity to cut into and use my growing collection of gel plate prints. Even though several pages were special, I wasn't as fearful cutting into these pages as I often feel with fabric. I didn't worry about cutting into the center to get just the right color or swatch! Any scraps were saved for future projects and/or adding hand-lettered words/phrases for my bowl of text!

I especially enjoyed using tone-on-tone prints for my finished book covers. Did you notice that each new book cover and spine were added in rainbow order?

5. Made Fodder-Tissue/Deli Paper-13 rolls

I enjoyed working with transparent fodder including deli paper, tissue paper, and vellum! Because they were thin and sometimes porous, I used a sheet of plastic underneath when painting/marking to capture any ink/paint. I also had to use other papers underneath to conceal the children's board book illustrations.

6. Artist Choice-22 rolls

I always enjoy including an Artist Choice roll as it affords me the opportunity to explore my favorite sources of fodder and/or experiment with new materials that may not fit the assigned categories. Here are a few different sources of fodder that made repeat appearances in my daily collages:

Tape including washi tape and painter's tape to construct a ladder shadow, striped flags, lettering, and accents...


Another source of fodder was wallpaper samples sourced from Fabmo, Inc , an organization dedicated to rescuing designer materials for creative reuse. They have a room full of wall paper swatches with each sheet priced between $.10 - $.25 each, so I always pick out a few new pieces during each visit!


These swatches introduced lots of gorgeous colors, patterns, and textures, including metallic accents! After seeing all these fun spreads, I definitely want to use more of these wall paper swatches in my future mixed-media creations!

Mixed Media Techniques

Over the course of the 100 days, there were several techniques that were revisited in new and exciting ways as inspired by the dice rolls. 

Block Printing: I couldn't resist the urge to incorporate block printing. Some days I revisited previously carved blocks and/or commercial foam stamps. Other days I was inspired to carve a new block and/or create a foam sticker stamp as inspired by the design photo.


Markers/Pens: Markers and pens were certainly used for much of the hand-lettered text, but oftentimes, the markers & pens played a significant roll in the overall design and/or adding accents/details to individual elements. Some of my favorite markers include Posca Paint Pens (both the large bullet tip and fine bullet tip), Ecoline Brush Pens, Tombow 2 in 1 brush pens, Uniball Signo Gel Pens, and Gelly Roll pens. 

Circle Abstractions: I believe it was Jennifer Wilkin Penick's 1-hour Color Wheels Art Play class that introduced me to circle punches. After her demo, I ordered 6 different sizes and put those circle punches to use in several of my layered collages!

Watercolor: For years, watercolor painting never really appealed to me partially because I perceived them to be difficult to control and they yielded very muted colors. Several of the Love Your Imperfect Hand Lettering challenges involved watercolor painting and so I decided to revisit watercolor painting. Wow--I was surprised by how much I enjoyed the meditative nature of watercolor painting! I purchased a Niji Artist Watercolors Essential Set of 12 Colors and watched several YouTube videos including Willa Wander's  video demo on The Mother Method of Color Mixing for All Artists and All Paint Mediums. After seeing the range of colors that can be created from a limited color palette, I was hooked on watercolor painting! I especially enjoyed painting little bits that I could then carefully cut out and incorporate into my collages!

Tools:

I've mentioned several of the tools/supplies, used, but thought I would include a list of my favorite supplies used in this 100 Day Project...

Here are some of my favorite go-to tools for creating these layered collages:
  • Tim Holtz Tonic brand Snips and Shears: I had the 5" Mini Snips (great for fussy cutting small elements) and the 9.5" Shears, but purchased the 7" towards the end of my project too.
  • Circle Punches in a variety of sizes. Given the small size of my compositions, I used the 1", 3/4" and 1/4" the most, but I have several other larger sizes for use with larger projects.
  • Sizzix Curved Fine Tip Tweezers: These are amazing for handling delicate elements especially when applying glue and placing within my compositions. 
  • Reptile Premium Craft Adhesive: Wendy Solganic aka Willa Wanders introduced me to this glue during one of her Fodder School lessons and I too love it because it sets fairly quickly and dries clear. I transferred it into a small bottle with a fine tip which worked even better for applying onto small bits.
  • Assorted Washi Tape--both for taping down layers when tracing and block printing, as well as for designing.
  • Rotary Cutter, Mat and Rulers: I had several from making quilts. My rotary cutter blade definitely needs to be changed after it was used with paper and often got bits of glue onto it when trimming each page even with the board book background. When traveling, I packed a small Accuquilt GO! cutting mat for use with my rotary cutter!

Here are some of my favorite mark-making supplies from the project:
  • Posca paint pens (large bullet tip and fine bullet tip)
  • Uniball Signo UM 153 pens--they come in a variety of colors and I especially love the white, silver, and gold pens for use on dark backgrounds!
  • Uniball Air pens that Wendy aka Willa Wanders introduced in her Love Your Imperfect Lettering course.
  • Sakura's Gelly Roll pens
  • Yasatomo's Niji Artist Watercolors Essential Set of 12 Colors and their Fusion Brushes sizes 2-5.
  • Sakura's Micron Pens (available in a variety of colors and tips)
  • Liqeo Pro Permanent Marker

Organization:

It's always interesting to see how my studio adapts for each 100 Day Project in order to have the materials and supplies readily accessible and organized. Earlier in the year, I purchased a small VATTENKAR Desktop shelf from IKEA which was perfect for holding many of my to-go tools: scissors, glue, rotary cutter, Washi tape, tweezers, etc next to where I did much of my creating. Behind me, my pegboard cabinet originally contained mostly quilting notions--many of which I rarely, if ever used. So I pulled everything out and consolidated much of the quilting gear to the right side, leaving the left side available for paints, circle cutters, and other mixed media tools!


Between this 100 Day Project, Fodder School, Gel Plate Printing, and other mixed-media classes, my collection of fodder continues to expand. At the start of this project I would sort through a pile of gel prints hoping to find just the right one, which took a lot of time and made it harder to find papers for future spreads. So I finally sorted them into 4 magazine racks: warm colors, cool colors, neutrals, and multi-color. This was progress, but was still difficult to find given the different sources of fodder, several of which (tissue paper/deli paper) were delicate and needed more careful handling. Thankfully I picked up some great organization ideas from the Papercrafters Get Organized Summit in April! A visit to the Container Store and Staples yielded a new rainbow filing system with folders for each color and separate spaces for gel prints, delicate prints, security envelopes, and more. This fodder storage system will be a work in progress as I have some fodder that still needs sorting, as well as new fodder being added to the mix, and who knows what kind of fodder awaits me in future Fodder School lessons and other mixed media classes! So for now, I have a box that holds unsorted fodder that I tackle in small bits each week.

Creating Throughout My Travels

There were several travel trips that that coincided and almost deterred my participation in this year's 100 Day Project. Instead I tried to celebrate these upcoming trips as an infusion of new design inspiration for my project. I am proud of the fact that I managed to continue my daily creations throughout the entirety of this project, especially during my trips where my space and time for creating were limited. I thought I would share some of the challenges I faced and how I made it work during those trips.

Thankfully these board books were fairly small with each page measuring 3.5" x 4". While this smaller format was challenging design-wise, it made this project fairly portable. Below are a few images I took of my temporary travel studios including:
  • Top Row L to R: Asilomar Conference Center in Pacific Grove while teaching at Empty Spools Seminars (first two photos), Fresno hotel, and Toronto Hilton.
  • Bottom Row: Southwest flight (first two) and Kauai trip (last two)

Thankfully the first two trips to involved car travel, so I was able to pack extra supplies. As my trip to Toronto approached, I was able to determine which tools/supplies were essential and consolidate accordingly as I was limited to carryon luggage only. Besides very limited space, my biggest challenge was not being able to bring my rotary cutter to Toronto, so the edges of that book are not quite as smooth as I was using small scissors to trim. Thankfully I was flying Southwest to Kauai, so I had an entire suitcase dedicated just to art supplies...some of which I carried on for a bit of in-flight creative play!

I certainly scaled down the mark making tools to my watercolor basic set, a few black pens/markers, metallic/white pens, and I usually brought the entire collection of Posca pens which fit into a gallon-sized Ziploc bag. 

Below are the travel tools I took with me (with exception of the large shears and rotary cutter for my Toronto travel as they were not safe for carryon luggage). I transferred the Reptile glue into the small bottle to stay under the liquids rule, brought the small snips which complied with TSA's rules, and had several zip pouches containing mostly raw materials for making fodder: torn out pages from the books, deli paper, black paper, and small pads of watercolor paper. I also brought the small scraps cut away from previous projects for a bit of hand made fodder to create on the fly. Otherwise, I was a bit of a scavenger, saving travel brochures, maps, and all and any packaging from my travels. In some ways, having limited supplies made it easier to jump in and get creating, with the limited time I had away from teaching and/or attending the SAQA conference. 

I feel like I am forgetting something big, but hopefully this captures the scope of my project and helps answer some of your questions. If you have other questions, leave a comment below.

Many thanks to everyone who joined me on this creative journey. Special thanks to all the artists who influenced my daily creations, all my family and friends who patiently waited as I paused to take lots of photos for inspiration, my travel companions who were understanding when I snuck away to create, and to all of you for your encouragement throughout this project!


Comments

  1. This was a fantastic article! I love the details you provided on your dice roll topics to use! The journals look so fun!!

    ReplyDelete
    Replies
    1. Aww...thank you! I am so glad you enjoyed this blog post and how the dice inspired me to play in these journals!

      Delete

Post a Comment

I am delighted you took the time and thought to leave me a comment. It may take a day or two for your comment to appear as I moderate them prior to posting to filter out spam and inappropriate content. Cheers!