 |
| Fabrics featured in this post were provided by Michael Miller Fabrics as part of being a Michael Miller Brand Ambassador |
This month's Michael Miller project features the NEW Sew Fruity collection. Not only do I love the bright and cheerful colors, but I love how they abstracted the fruit textures into coordinating prints!
 |
| Fruit Toss Prints and Coordinating Cotton Couture Solids |
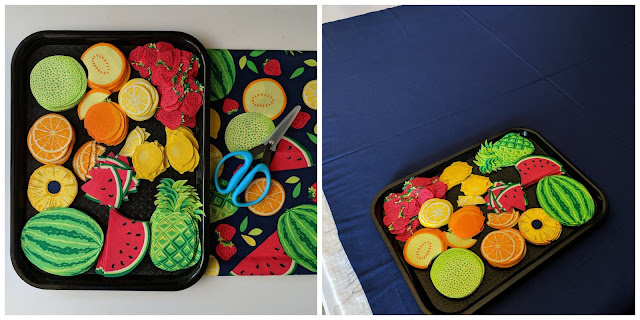
For my project, I planned to create a new raw edge fused mandala. Since most of my mandala designs are based on having 8 identical wedges, I requested 8 repeats of the Tropical Fruit Toss print to construct my mandala and 1 yard of Midnight Cotton Couture for my background. Note that when I was first planning my project, I only saw a small square of the print and did not know how many repeats were printed across the width of the fabric. Once the fabric arrived, I realized there were multiple repeats across and so I opted to only fuse 4 repeats, which yielded 8-16+ repeats of each fruity motif. Pellon 805 Wonder-Under was fused onto the backside of the Fruit Toss yardage according to Pellon's instruction. Once the fusible cooled, I carefully peeled away the paper backing and used my Karen Kay Buckley 6" scissors to cut out all the individual fruit motifs. Note this involved multiple sessions, usually done while watching TV.
 |
| Carefullly Cutting Out the Fruity Motifs |
One of my New Year's Resolutions this year is to prioritize a work/life balance, including a renewed focus on self-care. Earlier this month, I joined a local gym that offered Yoga classes. Before my first Yoga class, I prepared a quilt sandwich composed of the Punch colorway of the Fruit Toss fabric (good side facing the table), batting, and the Midnight Cotton Couture solid on top.
Many thanks to my Yoga instructor, Michelle, and fellow Yogi, Gayle, my return to Yoga was incredible! Not only did I impress myself by remembering many of the poses and breathing exercises, but I returned to my studio in a wonderful meditative state. I went into my studio and surrounded myself with the piles of carefully cut fruits. Starting in the center, I began to play with the various fruit motifs and forming concentric rings. I really enjoy the improvisational nature of creating mandalas, as I only need to make one decision at a time. Over the course of the afternoon, I watched as my mandala grew one layer at a time. Lucky for you, I managed to pause long enough to snap a photo so you could watch my mandala evolve as I made small additions and adjustments.
 |
| Making of a Mandala |
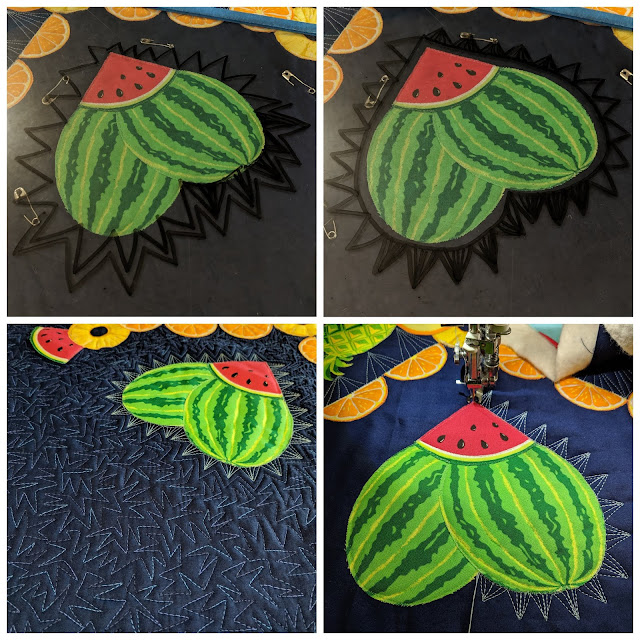
While the bulk of the mandala was laid out that first afternoon, I did make some minor adjustments the following day. The large watermelon units initially resembled Mickey Mouse ears, so I replaced them with watermelon hearts. I also swapped out the whole lemons for lemon slices in the center section. I tried to work the cantaloupes (originally used in the Mickey ears) back into the design, but they just didn't work, so they were left out of the final design. Over the next day or two, I made sure everything was centered and aligned, prior to fusing into place with a hot, dry iron.
 |
| Outline Stitching with Monofilament to Create Texture |
Once all the motifs were fused into place, I used Aurifil Monofilament thread on top to outline stitch and enhance the fruity textures. Placing my acrylic plastic square over my mandala, I was able to use dry erase markers to doodle different designs and figure out the most efficient travel pathway.
 |
| Auditioning Filler Designs |
The acrylic plastic and dry erase markers were used to audition different designs for each of the background areas needing quilting. These auditions are invaluable, as I would much prefer to erase the marker drawings than have to rip out stitches of a design that doesn't complement the quilt top's design.
 |
| Mark-Free Quilting Using Painter's Tape |
My other favorite tool is using Painter's Tape for mark-free planning of my quilting designs, invaluable for designs involving straight lines. Usually I use Blue Painter's tape, but opted to use Scotch Masking Tape for Concrete, Brick, and Grout, as it is tackier, and could be repositioned over and over for use with all 8 repeats.
 |
| Watching the Starry Points Transform with Quilting |
Usually the first 1-4 repeats of each design require my full concentration. But once I start to develop muscle memory, my mind can start contemplating designs for the other background areas.
 |
| Radiating Lines Are the Star |
For most of my mandalas, I select only 1-2 motifs, but play with adjusting the selected motif(s) to fit the various areas of negative space. Perhaps I play with the scale, width and/or length of a particular design, or change the focal point or direction, experiment with symmetry, or simply include multiple repeats to fill in a particular space. For this mandala, I used radiating lines to fill in around the pineapples, between watermelon slices, and around the watermelon hearts.
 |
| Loving the Spikey Rays |
I filled in the background with my favorite Zig Zag Meander that sparkles when stitched with a variegated thread.
 |
| All Star Threads |
- Aurifil 50wt Light Grey Turquoise (2805)-Radiating Lines
- Aurifil 50wt Light Blue Violet (1128)-Bobbin while quilting background
- Superior King Tut 40wt Lapis Lazuli (903)-Background Zig Zag
- Aurifil 50wt Green (2870)-Quilt Sleeve
- Aurifil 50wt Red (2250)-Binding
- Aurifil Monofilament (MT1000)-Quilting Fruit Motifs
- Aurifil 50wt White (2024)-Bobbin thread while stitching with Monofilament (not shown)
 |
| Shape Shifting |
I wasn't sure what shape my final quilt would be, so I quilted the entire square. While I loved the idea of a completely circular quilt, I was concerned about the challenges of hanging a circular quilt. I was aware of Quilt Shaper wire that would aide with the hanging, but might pose additional challenges for travel/shipping. So I compromised and left the top flat, and rounded out the rest of the quilt. Once I was done trimming, it reminded me of a stemless wine glass, perfect for enjoying some Sangria!
 |
| Breakfast and Quilt Backing |
While having breakfast in my studio, I began to wonder whether my quilt project was inspiring my meal or was my meal inspiring my quilting?!?
The next decision was choosing a binding fabric. Initially I requested some of Michael Miller's Cherry Gingham Play print from their basics collection. I also had some leftover fabrics from my July Christmas Countdown Calendar. I wanted to save the Gingham for use with another project, and I really liked how the Watermelon Cotton Couture gave more prominence to the watermelons and strawberries motifs.
 |
| Binding Auditions |
Earlier this week, I attended Michelle's Yoga class, and returned home to complete my mandala design. It only seemed fitting that I bring in my finished mandala design to show to Michelle and thank her for inspiring me in and outside the Yoga classes!
 |
| Sew Fruity Mandala, Finishes 36" x 37" |
I still have one decision left to make: quilt title! I'd love to hear your naming suggestions! Leave a comment below or contact me via email!
I had so much fun working with the Sew Fruity fabric collection, that I started a second project using the remaining 4 repeats of the Fruit Toss print and a double border print. I can't wait to share more in a future blog post, but Panda insisted I share a little sneak peek!
 |
| More Sew Fruity Fun to Come! |
Many thanks for visiting! Be sure to check your local quilt shop and stock up on this fun & fruity fabric collection. Wishing you all: Namaste!!

Beautiful work!
ReplyDeleteThank you! I love designing mandala quilts and this one was super fun to create!!
Delete